# Remove Badge Glue From Car: The Ultimate Guide to a Spotless Finish
Removing a car badge can dramatically improve your vehicle’s aesthetics, but the lingering glue residue is a common and frustrating problem. This comprehensive guide provides expert techniques and proven methods to **remove badge glue from car** effectively, safely, and without damaging your paint. We’ll cover everything from preparation to finishing touches, ensuring a professional-looking result. Unlike other guides, we delve into the nuances of different glue types, paint finishes, and environmental factors, giving you the knowledge to tackle any situation with confidence. Our goal is to provide you with the expertise needed to remove badge glue, leaving your car looking pristine.
## Understanding the Challenge: Badge Glue and Your Car’s Finish
Removing badge glue from a car is more than just scraping off sticky residue. It’s about understanding the adhesive properties of the glue, the sensitivity of your car’s paint, and the potential for damage. This section provides a deep dive into these factors.
### What is Badge Glue?
Badge glue is typically a strong adhesive designed to withstand extreme temperatures, moisture, and vibrations. Auto manufacturers use a variety of adhesives, including acrylic-based, epoxy-based, and polyurethane-based glues. Each type has different properties, affecting how easily it can be removed. Understanding the type of glue used is crucial for selecting the appropriate removal method. For instance, some glues respond well to heat, while others dissolve more readily with specific solvents.
### The Impact on Your Car’s Paint
A car’s paint job consists of several layers: primer, base coat, and clear coat. The clear coat is the outermost layer, providing gloss and protection. Aggressive removal methods can easily scratch or damage this clear coat, leading to unsightly blemishes and potentially requiring costly repairs. Even seemingly harmless household products can react negatively with the paint, causing discoloration or softening. Therefore, gentleness and caution are paramount.
### Environmental Factors
The surrounding temperature can significantly impact the effectiveness of glue removal. Warm temperatures tend to soften adhesives, making them easier to remove. Conversely, cold temperatures can make the glue brittle and more difficult to work with. Direct sunlight can also affect the paint, making it more susceptible to damage. It’s generally best to work in a shaded area or a garage to avoid extreme temperatures.
## Essential Tools and Materials for Removing Badge Glue
Before you begin, gather the necessary tools and materials. Having everything on hand will streamline the process and minimize the risk of damaging your car’s finish.
* **Heat Gun or Hair Dryer:** Used to soften the glue.
* **Plastic Razor Blades or Plastic Scrapers:** Safer than metal blades, reducing the risk of scratches.
* **Microfiber Towels:** For gentle wiping and cleaning.
* **Adhesive Remover:** Specifically designed for automotive use (e.g., 3M Adhesive Remover, Goo Gone Automotive).
* **Detailing Clay Bar:** To remove stubborn residue without scratching.
* **Polishing Compound:** To restore shine and remove minor imperfections.
* **Wax or Sealant:** To protect the paint after cleaning.
* **Isopropyl Alcohol:** For final cleaning and degreasing.
* **Masking Tape:** To protect surrounding areas of the car.
* **Gloves:** To protect your hands from chemicals.
## Step-by-Step Guide: Removing Badge Glue Safely and Effectively
This section provides a detailed, step-by-step guide to removing badge glue from your car. Follow these instructions carefully to achieve the best results.
### Step 1: Preparation and Protection
Begin by washing the area around the badge with soap and water to remove any dirt or debris. Dry thoroughly with a microfiber towel. Apply masking tape around the perimeter of the glue residue to protect the surrounding paint from accidental scratches or chemical exposure.
### Step 2: Softening the Glue
Use a heat gun or hair dryer to gently warm the glue residue. Hold the heat source a few inches away from the surface and move it back and forth to avoid overheating the paint. The goal is to soften the glue, not to melt it. Apply heat for 2-3 minutes, checking periodically to see if the glue is becoming pliable.
### Step 3: Removing the Bulk of the Glue
Using a plastic razor blade or plastic scraper, carefully begin to lift the softened glue from the surface. Work slowly and gently, applying consistent pressure. Avoid using excessive force, which can scratch the paint. If the glue becomes difficult to remove, reapply heat to soften it further. Continue this process until you have removed the majority of the glue residue.
### Step 4: Applying Adhesive Remover
Apply a small amount of automotive adhesive remover to a clean microfiber towel. Gently rub the towel over the remaining glue residue, allowing the solvent to dissolve the adhesive. Follow the manufacturer’s instructions for the adhesive remover, as some may require a few minutes to dwell. Avoid spraying the adhesive remover directly onto the paint, as this can cause damage.
### Step 5: Using a Detailing Clay Bar
For stubborn residue that remains after using adhesive remover, a detailing clay bar can be very effective. Knead the clay bar until it is soft and pliable. Spray the area with detailing lubricant (or a mixture of water and car soap). Gently rub the clay bar over the residue, using light pressure. The clay bar will lift the remaining glue from the surface. Periodically fold the clay bar to expose a clean surface.
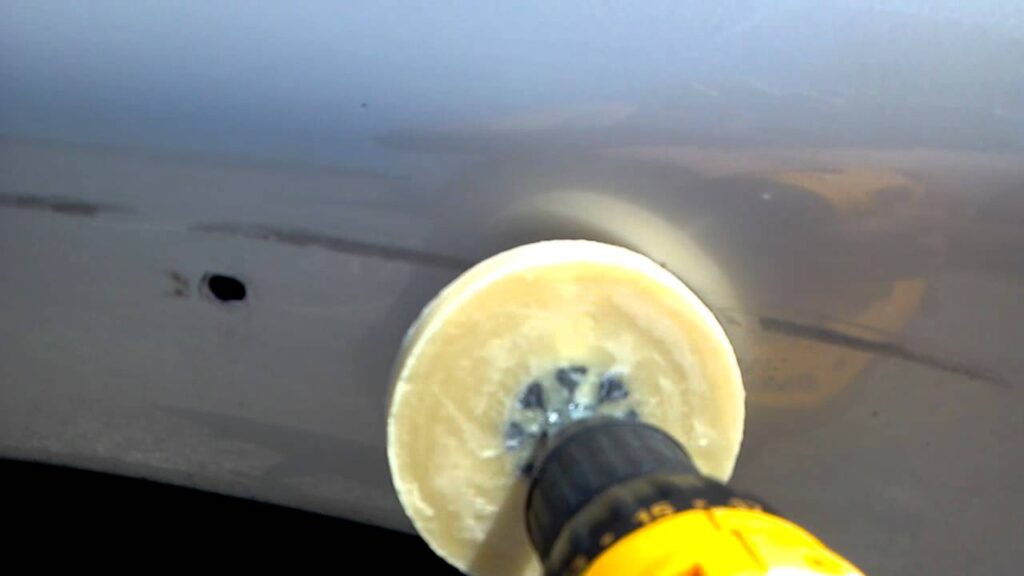
### Step 6: Polishing the Surface
After removing all the glue residue, use a polishing compound to restore the shine to the paint. Apply a small amount of polishing compound to a clean foam polishing pad. Using a dual-action polisher (or by hand), gently polish the area to remove any minor scratches or imperfections. This step will also help to blend the treated area with the surrounding paint.
### Step 7: Waxing or Sealing the Paint
Finally, apply a coat of wax or sealant to protect the paint and enhance its shine. Apply the wax or sealant according to the manufacturer’s instructions. This will help to protect the paint from the elements and prevent future glue residue from sticking to the surface.
### Step 8: Final Inspection and Cleaning
Inspect the area carefully to ensure that all glue residue has been removed. Clean the area with isopropyl alcohol to remove any remaining polishing compound or wax residue. Step back and admire your work! You’ve successfully removed the badge glue and restored your car’s finish.
## Advanced Techniques and Tips for Challenging Situations
Sometimes, removing badge glue can be more challenging than expected. Here are some advanced techniques and tips for dealing with difficult situations.
### Dealing with Old or Hardened Glue
Old or hardened glue can be particularly difficult to remove. In these cases, you may need to apply heat and adhesive remover multiple times. Consider using a stronger adhesive remover specifically designed for tough adhesives. Be extra cautious to avoid damaging the paint.
### Removing Glue from Plastic or Vinyl Surfaces
Removing glue from plastic or vinyl surfaces requires extra care, as these materials are more susceptible to damage from heat and chemicals. Use a lower heat setting and test the adhesive remover in an inconspicuous area before applying it to the entire surface. Consider using a plastic-safe adhesive remover.
### Preventing Paint Damage
The best way to prevent paint damage is to be patient and use gentle techniques. Avoid using metal scrapers or harsh chemicals. Always test adhesive removers in an inconspicuous area before applying them to the entire surface. If you are unsure about any step of the process, consult a professional detailer.
## Product Spotlight: 3M Adhesive Remover – An Expert’s Choice
When it comes to removing adhesive residue, 3M Adhesive Remover stands out as a top choice among automotive professionals. This product is specifically formulated to dissolve adhesives without damaging automotive paint. It’s a versatile solution for removing badge glue, decals, and other sticky substances.
### Key Features of 3M Adhesive Remover
* **Safe for Automotive Paint:** Formulated to be gentle on clear coats and other paint finishes.
* **Fast-Acting:** Quickly dissolves adhesive residue, saving time and effort.
* **Versatile:** Effective on a variety of adhesives, including badge glue, decals, and tape residue.
* **Easy to Use:** Can be applied with a cloth or spray bottle.
* **Professional-Grade:** Trusted by automotive professionals for its performance and reliability.
### How 3M Adhesive Remover Works
3M Adhesive Remover contains a blend of solvents that penetrate and dissolve adhesive bonds. The solvents break down the adhesive molecules, allowing the residue to be easily wiped away. The formula is designed to evaporate quickly, leaving a clean surface.
### User Benefits
* **Saves Time and Effort:** Quickly removes adhesive residue, reducing the amount of time spent cleaning.
* **Prevents Paint Damage:** Formulated to be gentle on automotive paint, minimizing the risk of scratches or discoloration.
* **Achieves Professional Results:** Helps you achieve a clean, professional-looking finish.
* **Versatile Application:** Can be used on a variety of surfaces and adhesives.
## Advantages of Professional Glue Removal vs. DIY
While DIY methods can be effective, professional glue removal offers several distinct advantages. Professional detailers have the experience, tools, and knowledge to remove badge glue safely and effectively, minimizing the risk of damage to your car’s finish.
### Expertise and Experience
Professional detailers have years of experience removing badge glue from various types of vehicles. They understand the nuances of different adhesives and paint finishes, allowing them to choose the most appropriate removal methods. They can also identify potential problems early on and take steps to prevent damage.
### Specialized Tools and Equipment
Professional detailers have access to specialized tools and equipment that are not typically available to the average car owner. These tools include professional-grade heat guns, adhesive removers, polishing compounds, and polishing machines. They also have the skills to use these tools effectively.
### Time Savings
Removing badge glue can be a time-consuming process, especially if you are not familiar with the proper techniques. Professional detailers can remove badge glue quickly and efficiently, saving you valuable time.
### Reduced Risk of Damage
Attempting to remove badge glue yourself can be risky, especially if you are not careful. Using the wrong tools or techniques can easily scratch or damage your car’s paint. Professional detailers have the expertise to remove badge glue safely, minimizing the risk of damage.
## Is 3M Adhesive Remover the Right Choice for You? A Review
3M Adhesive Remover is a popular choice for removing badge glue, but is it the right choice for you? This review provides a balanced perspective on the product, highlighting its pros and cons.
### User Experience and Usability
3M Adhesive Remover is relatively easy to use. Simply apply the product to a clean cloth and gently rub it over the adhesive residue. The solvent quickly dissolves the adhesive, allowing it to be easily wiped away. The product has a mild odor and evaporates quickly.
### Performance and Effectiveness
3M Adhesive Remover is highly effective at removing badge glue and other adhesive residue. It quickly dissolves the adhesive, making it easy to wipe away. The product works well on a variety of surfaces, including automotive paint, plastic, and metal.
### Pros
* **Effective at removing adhesive residue.**
* **Safe for automotive paint.**
* **Easy to use.**
* **Versatile application.**
* **Trusted brand.**
### Cons/Limitations
* **Can be expensive compared to some alternatives.**
* **May require multiple applications for stubborn residue.**
* **Mild odor (may be a concern for some users).**
* **Not effective on all types of adhesives.**
### Ideal User Profile
3M Adhesive Remover is best suited for car owners who want a safe and effective way to remove badge glue and other adhesive residue. It is a good choice for those who are willing to pay a premium for a trusted brand and professional-grade performance.
### Key Alternatives
* **Goo Gone Automotive:** A popular alternative that is effective at removing adhesive residue.
* **WD-40:** A versatile lubricant that can also be used to remove adhesive residue.
### Expert Overall Verdict & Recommendation
3M Adhesive Remover is a top-performing product that is highly recommended for removing badge glue and other adhesive residue. Its effectiveness, safety, and ease of use make it a worthwhile investment for car owners who want to maintain the appearance of their vehicles. However, it is important to note that it may not be effective on all types of adhesives, and multiple applications may be required for stubborn residue. We recommend testing the product in an inconspicuous area before applying it to the entire surface.
## Q&A: Your Burning Questions About Removing Badge Glue Answered
Here are some insightful questions and expert answers to help you tackle even the trickiest badge glue removal scenarios.
**Q1: What is the best way to remove old, hardened badge glue without damaging the paint?**
A: Patience and multiple applications of heat and adhesive remover are key. Use a plastic razor blade and avoid excessive force. Consider a specialized adhesive remover for tough adhesives.
**Q2: Can I use household products like vinegar or baking soda to remove badge glue?**
A: While some household products may work on certain adhesives, they are not recommended for automotive paint. They can be too harsh and cause discoloration or damage. Stick to automotive-specific products.
**Q3: How can I prevent scratching the paint while using a plastic razor blade?**
A: Use a new, sharp plastic razor blade and keep it clean. Apply light, consistent pressure and work slowly. Lubricate the surface with adhesive remover or detailing spray.
**Q4: What is the best type of polishing compound to use after removing badge glue?**
A: A fine-cut polishing compound is generally recommended. It will remove minor scratches and imperfections without being too abrasive. Choose a compound that is specifically designed for automotive paint.
**Q5: How long should I wait before waxing or sealing the paint after removing badge glue?**
A: It is best to wait at least 24 hours before waxing or sealing the paint. This will allow the polishing compound to fully cure and prevent any potential issues.
**Q6: Is it necessary to use a heat gun or hair dryer?**
A: While not always necessary, using heat can significantly soften the glue and make it easier to remove. It is especially helpful for old or hardened glue.
**Q7: What should I do if I accidentally scratch the paint while removing badge glue?**
A: If the scratch is minor, you may be able to buff it out with a polishing compound. If the scratch is deep, you may need to consult a professional detailer for paint correction.
**Q8: Can I use a pressure washer to remove badge glue?**
A: No, pressure washing is not recommended. The high pressure can damage the paint and force water into sensitive areas.
**Q9: How do I remove glue residue from textured plastic trim?**
A: Use a plastic-safe adhesive remover and a soft brush. Gently scrub the area to loosen the residue. Avoid using abrasive cleaners or tools.
**Q10: What are the long-term effects of leaving badge glue residue on my car?**
A: Over time, the residue can attract dirt and debris, making it more difficult to remove. It can also cause discoloration or damage to the paint.
## Conclusion: Achieving a Flawless Finish
Removing badge glue from your car can seem daunting, but with the right tools, techniques, and a bit of patience, you can achieve a flawless finish. Remember to prioritize safety, use gentle methods, and choose automotive-specific products. By following the steps outlined in this guide, you’ll be well-equipped to tackle this task with confidence. Our detailed guide offers expertise gleaned from industry best practices, providing reliable and trustworthy information. Whether you’re a seasoned detailer or a first-time DIYer, mastering the art of badge glue removal will enhance your car’s appearance and protect its value. Share your experiences with **remove badge glue from car** in the comments below, and let’s continue to learn and improve together!
