Replace Bicycle Brake Pads: A Complete Expert Guide
Is your bicycle’s stopping power not what it used to be? Do you hear a screeching sound every time you brake? Chances are, it’s time to replace your bicycle brake pads. This comprehensive guide will walk you through the entire process, from identifying the right brake pads to the actual replacement, ensuring your safety and optimal braking performance. We’ll cover everything you need to know to replace bicycle brake pads effectively and safely.
Unlike many basic tutorials, this article offers a deep dive into the nuances of brake pad replacement, including understanding different brake systems, choosing the correct pad compounds, and troubleshooting common issues. We aim to provide you with the expertise to confidently maintain your bicycle’s brakes, saving you time and money while ensuring your safety on the road or trail.
Understanding Bicycle Brake Systems
Before you even think about replacing your brake pads, it’s crucial to understand the type of brake system your bicycle uses. The two main types are rim brakes and disc brakes. Each requires different pads and replacement techniques.
Rim Brakes
Rim brakes, also known as V-brakes, cantilever brakes, or caliper brakes, work by applying pressure to the rim of the wheel. The brake pads are made of rubber or a rubber compound and wear down over time due to friction. Rim brakes are common on older bikes and some road bikes due to their simplicity and low weight.
- V-Brakes: Offer strong stopping power and are relatively easy to adjust.
- Cantilever Brakes: Common on older mountain bikes and touring bikes, providing good mud clearance.
- Caliper Brakes: Found on road bikes, offering lightweight and aerodynamic designs.
Disc Brakes
Disc brakes, on the other hand, use a rotor attached to the wheel hub and a caliper mounted on the frame or fork. The brake pads, made of various compounds, clamp onto the rotor to slow down or stop the bike. Disc brakes are increasingly popular, especially on mountain bikes, gravel bikes, and some road bikes, due to their superior stopping power, especially in wet or muddy conditions.
- Mechanical Disc Brakes: Use a cable to actuate the caliper, similar to rim brakes.
- Hydraulic Disc Brakes: Use hydraulic fluid to transfer force from the lever to the caliper, providing more consistent and powerful braking.
Choosing the Right Brake Pads
Selecting the correct brake pads is crucial for optimal braking performance and safety. Brake pads come in various materials, each with its own advantages and disadvantages. It’s not just about finding the cheapest option; it’s about finding the right pad for your riding style and conditions. When you replace bicycle brake pads, consider these factors.
Brake Pad Compounds
- Organic (Resin) Pads: Made from organic materials like rubber, Kevlar, and resin binders. They are quieter, offer better modulation (feel), and are gentler on rotors/rims. However, they wear down faster, especially in wet conditions, and may fade under heavy use.
- Metallic (Sintered) Pads: Made from metallic particles fused together. They offer superior stopping power, longer lifespan, and better performance in wet or muddy conditions. However, they can be noisy, wear down rotors/rims faster, and may lack the modulation of organic pads.
- Semi-Metallic Pads: A blend of organic and metallic materials, offering a compromise between the two. They provide good stopping power, decent lifespan, and acceptable noise levels.
Compatibility
Ensure the brake pads you choose are compatible with your specific brake system. Brake pad manufacturers often provide compatibility charts or lists. Consulting your bicycle’s manual or the brake manufacturer’s website is highly recommended. Using the wrong pads can lead to poor braking performance, damage to your brake system, and potential safety hazards. Remember to always replace bicycle brake pads with a compatible set.
Identifying Your Current Brake Pads
Before purchasing new brake pads, identify the model of your existing brake pads. Look for markings on the pads themselves or the brake caliper. This information will help you find compatible replacements. If you’re unsure, consult your local bike shop for assistance. They can help you identify your brake system and recommend suitable pads. A visual inspection can also help, comparing the shape and size of your old pads to images online.
Tools and Materials Needed to Replace Bicycle Brake Pads
Before you start the replacement process, gather all the necessary tools and materials. Having everything on hand will make the job smoother and more efficient. A well-prepared workspace is key to a successful brake pad replacement. Consider these essentials before you replace bicycle brake pads:
- New Brake Pads: Ensure they are compatible with your brake system.
- Appropriate Tools: Allen wrenches, screwdrivers, pliers, brake pad spreader (optional but recommended).
- Clean Rags: For cleaning the brake calipers and rotors/rims.
- Brake Cleaner: To degrease the rotors/rims and calipers.
- Gloves: To protect your hands from grease and grime.
- Work Stand (Optional): Makes the job easier by lifting the bike off the ground.
- Torque Wrench (Optional): For tightening bolts to the correct torque specifications.
Step-by-Step Guide to Replacing Rim Brake Pads
Replacing rim brake pads is a relatively straightforward process. Follow these steps for a successful replacement. Always prioritize safety and double-check your work. Here’s how to replace bicycle brake pads on a rim brake system:
- Loosen the Brake Cable: Use an Allen wrench or pliers to loosen the brake cable at the caliper. This will allow you to remove the old brake pads.
- Remove the Old Brake Pads: Depending on the brake type, you may need to unscrew a bolt or slide the pads out of their holders.
- Clean the Brake Calipers: Use a clean rag and brake cleaner to remove any dirt or debris from the calipers.
- Install the New Brake Pads: Insert the new brake pads into their holders, ensuring they are properly aligned with the rim.
- Tighten the Brake Cable: Reattach the brake cable to the caliper and tighten it securely. Adjust the cable tension so that the brake pads are close to the rim but not rubbing.
- Adjust Brake Pad Alignment: Ensure the brake pads are hitting the rim squarely. You may need to adjust their position using the adjustment screws on the calipers.
- Test the Brakes: Squeeze the brake levers to ensure the brakes are working properly. The brake pads should grip the rim firmly and stop the bike effectively.
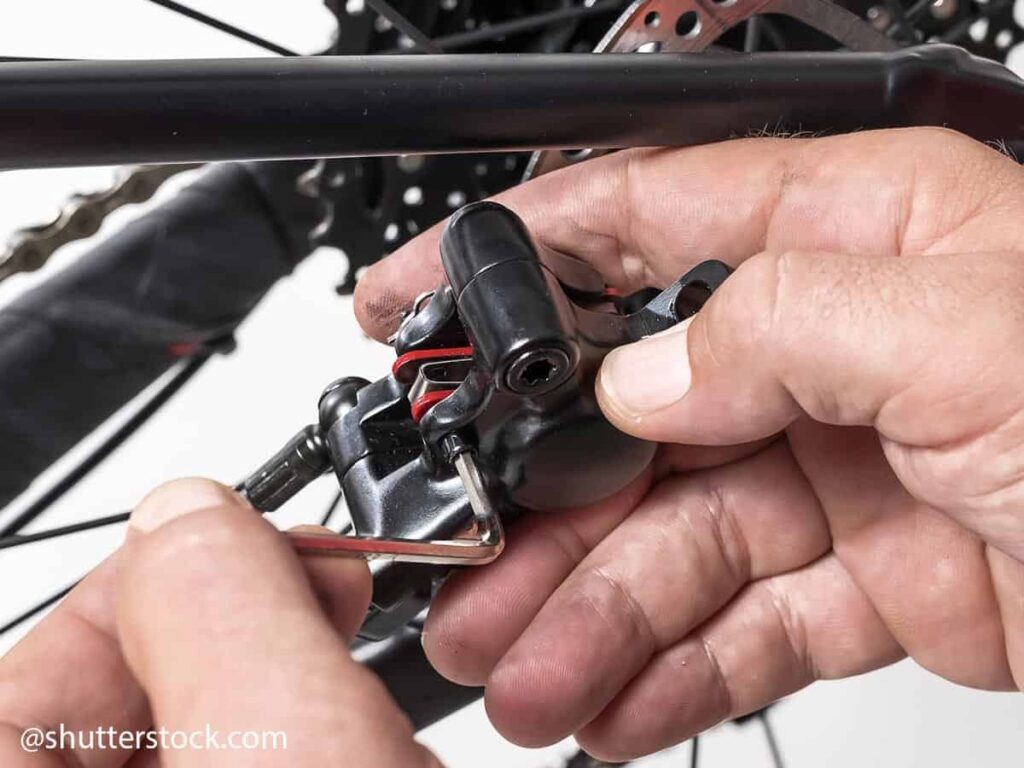
Step-by-Step Guide to Replacing Disc Brake Pads
Replacing disc brake pads is a bit more complex than replacing rim brake pads, but still manageable with the right tools and instructions. Follow these steps carefully. When you replace bicycle brake pads on a disc brake system, pay close attention to the details:
- Remove the Wheel: Remove the wheel from the bike.
- Remove the Caliper Retaining Bolt(s) or Pin: Depending on the brake model, you’ll need to remove a bolt or pin that holds the brake pads in place.
- Remove the Old Brake Pads: Slide the old brake pads out of the caliper. You may need to use a brake pad spreader to push the pistons back into the caliper if the pads are difficult to remove.
- Clean the Caliper: Use a clean rag and brake cleaner to remove any dirt or debris from the caliper.
- Push the Pistons Back: Use a brake pad spreader or a clean, flat tool to carefully push the pistons back into the caliper. This will create space for the new brake pads.
- Install the New Brake Pads: Insert the new brake pads into the caliper, ensuring they are properly aligned.
- Reinstall the Caliper Retaining Bolt(s) or Pin: Secure the brake pads in place by reinstalling the retaining bolt or pin.
- Reinstall the Wheel: Reinstall the wheel on the bike.
- Bed-In the New Brake Pads: Bedding in the new brake pads is crucial for optimal performance. This involves repeatedly applying the brakes firmly at moderate speeds to transfer brake pad material to the rotor.
Troubleshooting Common Brake Pad Replacement Issues
Even with careful attention, you might encounter some common issues when you replace bicycle brake pads. Here are some troubleshooting tips:
- Squealing Brakes: This can be caused by contamination on the rotors or brake pads. Clean the rotors and pads with brake cleaner. If the squealing persists, you may need to replace the pads or rotors.
- Brake Rub: This occurs when the brake pads are rubbing against the rotor or rim, even when the brakes are not applied. Adjust the caliper or brake pad alignment to eliminate the rubbing.
- Weak Braking Power: This can be caused by worn brake pads, contaminated rotors, or air in the hydraulic lines (for disc brakes). Replace the brake pads, clean the rotors, or bleed the hydraulic lines.
- Pistons Not Retracting: If the pistons in your disc brake caliper are not retracting properly, they may be dirty or damaged. Clean the pistons and lubricate them with a small amount of brake fluid. If the problem persists, you may need to rebuild or replace the caliper.
Maintaining Your Brakes for Optimal Performance
Regular maintenance is essential for keeping your brakes in top condition. Here are some tips:
- Inspect Brake Pads Regularly: Check the brake pads for wear and tear. Replace them when they are worn down to the minimum thickness.
- Clean Rotors/Rims Regularly: Use brake cleaner to remove dirt and grime from the rotors/rims.
- Check Brake Cables/Hydraulic Lines: Inspect the brake cables/hydraulic lines for damage. Replace them if necessary.
- Bleed Hydraulic Brakes: Bleed the hydraulic brakes regularly to remove air from the lines.
- Lubricate Brake Levers: Lubricate the brake levers to ensure smooth operation.
Expert Tips for Brake Pad Longevity
Maximize the lifespan of your brake pads with these expert tips:
- Avoid Excessive Braking: Anticipate stops and use progressive braking techniques to reduce wear.
- Use the Correct Brake Pad Compound: Choose the right brake pad compound for your riding conditions.
- Keep Rotors/Rims Clean: Regular cleaning prevents contamination and reduces wear.
- Properly Bed-In New Brake Pads: Bedding in ensures optimal performance and extends lifespan.
Q&A: Expert Answers to Your Brake Pad Replacement Questions
- Q: How often should I replace my bicycle brake pads?
A: The frequency depends on your riding style, conditions, and brake pad compound. Inspect them regularly and replace when they reach the minimum thickness or show signs of wear. - Q: Can I mix different brake pad compounds on the same bike?
A: It’s generally not recommended, as different compounds can have varying friction coefficients, leading to uneven braking. - Q: What causes brake squeal?
A: Brake squeal is often caused by contamination, vibration, or glazing of the brake pads or rotors. Cleaning or replacing the affected parts can usually resolve the issue. - Q: Are disc brakes always better than rim brakes?
A: Not necessarily. Disc brakes offer superior stopping power in wet conditions and are less affected by rim damage. However, rim brakes are lighter, simpler, and often more affordable. - Q: Can I use car brake cleaner on my bicycle brakes?
A: No, car brake cleaner can damage bicycle brake pads and rotors. Use a bicycle-specific brake cleaner. - Q: What is “bedding in” brake pads?
A: Bedding in involves repeatedly applying the brakes firmly at moderate speeds to transfer brake pad material to the rotor, improving braking performance and reducing squeal. - Q: How do I know if my hydraulic brakes need to be bled?
A: Signs include spongy brake lever feel, reduced braking power, and excessive lever travel. - Q: What is the minimum thickness for brake pads?
A: The minimum thickness varies by manufacturer but is typically around 0.5mm to 1mm. Consult your brake pad specifications. - Q: Can I reuse brake pads if I accidentally contaminate them?
A: It’s not recommended. Contamination can significantly reduce braking performance and increase the risk of brake failure. Replace contaminated pads. - Q: What are the signs of worn brake rotors?
A: Signs include excessive wear, scoring, warping, and reduced thickness. Consult your rotor specifications for minimum thickness.
Conclusion: Ensuring Safe and Effective Braking
Replacing your bicycle brake pads is a crucial maintenance task that directly impacts your safety. By understanding the different brake systems, choosing the right pads, and following the step-by-step instructions outlined in this guide, you can confidently replace your brake pads and ensure optimal braking performance. Remember to prioritize safety, use the correct tools, and perform regular maintenance to keep your brakes in top condition.
We hope this comprehensive guide has empowered you with the knowledge and confidence to tackle this essential maintenance task. Share your experiences with replacing bicycle brake pads in the comments below. For more advanced tips and troubleshooting, explore our related articles on bicycle maintenance.
