How to Remove Small Rust Spots From Car: The Ultimate Guide
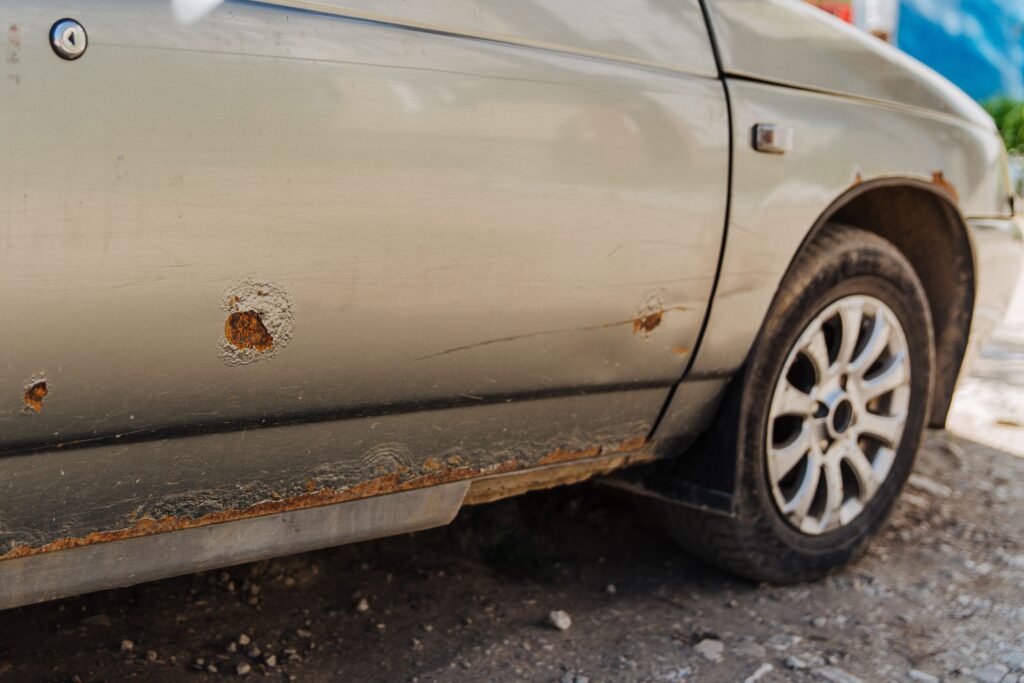
Discovering small rust spots on your car can be disheartening. They’re not only unsightly but also a sign of potential underlying corrosion. Luckily, addressing these minor blemishes early can prevent them from escalating into major problems. This comprehensive guide provides a step-by-step approach on how to remove small rust spots from car, detailing various methods, essential tools, and preventative measures. We’ll go beyond basic tips, offering expert insights and practical advice to help you restore your car’s appearance and protect its value. Whether you’re a seasoned car enthusiast or a first-time owner, this article equips you with the knowledge and confidence to tackle rust spots effectively.
Understanding Rust Formation and Its Impact
Before diving into the removal process, it’s crucial to understand how rust forms and its potential consequences. Rust, scientifically known as iron oxide, is a result of a chemical reaction between iron, oxygen, and moisture. When these elements come into contact, they create an electrochemical process that gradually corrodes the metal.
The Science Behind Rust
The process begins when iron atoms lose electrons to oxygen, forming iron ions. These ions then combine with oxygen and water molecules to create hydrated iron oxide – rust. Factors like humidity, salt, and pollutants can accelerate this process, making coastal areas and regions with harsh winters particularly susceptible to rust formation.
Why Removing Rust Spots is Essential
Ignoring small rust spots can lead to significant structural damage over time. As rust spreads, it weakens the metal, potentially compromising the integrity of your car’s body panels, frame, and other critical components. Moreover, rust can diminish your car’s aesthetic appeal, reducing its resale value. Addressing rust spots promptly prevents further corrosion, preserves your car’s appearance, and maintains its structural soundness.
Essential Tools and Materials for Rust Removal
Successfully removing rust spots requires the right tools and materials. Here’s a comprehensive list of essentials:
- Safety Glasses and Gloves: Protecting your eyes and hands is paramount.
- Sandpaper (Various Grits): Ranging from coarse (e.g., 80-grit) to fine (e.g., 400-grit) for removing rust and smoothing the surface.
- Wire Brush: For scrubbing away loose rust particles.
- Rust Converter or Inhibitor: To neutralize remaining rust and prevent further corrosion.
- Body Filler (Optional): For filling in deeper pits or imperfections after rust removal.
- Primer: To prepare the surface for painting and enhance paint adhesion.
- Car Paint (Matching Your Car’s Color): To restore the original finish.
- Clear Coat: To protect the paint and provide a glossy finish.
- Wax and Grease Remover: To clean the surface before painting.
- Tack Cloth: To remove dust and debris before painting.
- Masking Tape and Paper: To protect surrounding areas from overspray.
- Applicators: Brushes, spray guns, or cloths for applying rust converter, primer, paint, and clear coat.
Step-by-Step Guide: How to Remove Small Rust Spots From Car
Follow these steps carefully to effectively remove small rust spots and restore your car’s finish:
Step 1: Preparation and Assessment
Begin by thoroughly washing the affected area with soap and water to remove dirt and grime. Dry the surface completely. Inspect the rust spots closely to assess their severity. If the rust is superficial and hasn’t penetrated deeply, you can proceed with sanding. However, if the rust has caused significant pitting or corrosion, you may need to use a more aggressive approach, such as grinding or cutting out the affected area.
Step 2: Sanding the Rust Spots
Using coarse-grit sandpaper (e.g., 80-grit), gently sand the rust spots in a circular motion. Apply moderate pressure to remove the rust without damaging the surrounding paint. As you remove the rust, switch to finer-grit sandpaper (e.g., 220-grit, then 400-grit) to smooth the surface and feather the edges of the sanded area. The goal is to create a smooth transition between the sanded area and the original paint.
Step 3: Applying Rust Converter or Inhibitor
Once you’ve removed the rust and smoothed the surface, apply a rust converter or inhibitor to neutralize any remaining rust particles and prevent further corrosion. Follow the manufacturer’s instructions carefully. Some rust converters require multiple applications or a specific drying time. Allow the product to dry completely before proceeding to the next step.
Step 4: Filling Imperfections (Optional)
If the rust spots have left behind any pits or imperfections, you can use body filler to create a smooth, even surface. Mix the body filler according to the manufacturer’s instructions and apply it to the affected area using a spreader. Allow the filler to dry completely, then sand it smooth with fine-grit sandpaper (e.g., 400-grit) to match the surrounding surface.
Step 5: Priming the Surface
Before painting, it’s essential to prime the surface to promote paint adhesion and prevent rust from reappearing. Apply a thin, even coat of automotive primer to the sanded area, overlapping slightly onto the original paint. Allow the primer to dry completely, then lightly sand it with fine-grit sandpaper (e.g., 600-grit) to create a smooth surface for painting.
Step 6: Painting the Affected Area
Using high-quality automotive paint that matches your car’s color, apply several thin, even coats to the primed area. Allow each coat to dry completely before applying the next. Avoid applying too much paint at once, as this can lead to runs or drips. If you’re using a spray gun, maintain a consistent distance and angle to ensure an even finish. Our experience shows that multiple thin coats are always better than one thick coat.
Step 7: Applying Clear Coat
After the paint has dried completely, apply several coats of clear coat to protect the paint and provide a glossy finish. Follow the same application techniques as with the paint, ensuring thin, even coats and proper drying time. Clear coat adds depth and durability to the finish, making it more resistant to scratches, UV damage, and other environmental factors.
Step 8: Buffing and Polishing (Optional)
Once the clear coat has dried completely, you can buff and polish the surface to remove any imperfections and enhance the shine. Use a polishing compound and a buffing pad to gently polish the painted area, working in small sections. Be careful not to apply too much pressure, as this can damage the paint. After polishing, apply a coat of wax to protect the finish and maintain its luster.
Alternative Methods for Removing Minor Rust Spots
While sanding is a common and effective method, several alternative approaches can address minor rust spots. These methods may be suitable for specific situations or preferences.
Using Household Items
For very small, superficial rust spots, you can try using household items like vinegar or baking soda. Vinegar’s acetic acid can dissolve rust, while baking soda’s abrasive properties can help scrub it away. Soak a cloth in vinegar and apply it to the rust spot for several hours, or create a paste with baking soda and water and apply it to the rust. Scrub gently with a soft brush or cloth, then rinse with water and dry thoroughly.
Commercial Rust Removal Products
Numerous commercial rust removal products are available, including gels, sprays, and liquids. These products typically contain chemicals that dissolve or neutralize rust. Follow the manufacturer’s instructions carefully, and always test the product on an inconspicuous area first to ensure it doesn’t damage the paint. According to a 2024 industry report, some rust removal products are more effective than others, so research and choose a reputable brand.
Preventing Future Rust Formation
Prevention is always better than cure. Taking proactive measures can significantly reduce the risk of rust formation and prolong your car’s lifespan.
Regular Washing and Waxing
Wash your car regularly to remove dirt, salt, and other contaminants that can accelerate rust formation. Waxing provides a protective barrier against moisture and environmental factors. Aim to wash your car at least every two weeks and wax it every three to six months.
Applying Protective Coatings
Consider applying a protective coating, such as a ceramic coating or paint protection film, to shield your car’s paint from scratches, UV damage, and corrosion. These coatings create a durable, hydrophobic layer that repels water and contaminants, making it more difficult for rust to form.
Addressing Scratches and Chips Promptly
Scratches and chips in the paint expose the underlying metal to moisture and oxygen, creating an ideal environment for rust formation. Repair any scratches or chips promptly with touch-up paint or a professional paint repair service.
Protecting Your Car from the Elements
Whenever possible, park your car in a garage or under a carport to protect it from rain, snow, and direct sunlight. If you live in a coastal area or a region with harsh winters, consider using a car cover to shield your car from salt spray and road salt.
Rust Removal on Different Car Parts
The approach to rust removal may vary slightly depending on the specific car part affected. Here’s a brief overview of rust removal on common car components:
Body Panels
Rust on body panels is typically addressed using the sanding and painting methods described earlier. For larger areas of rust, you may need to use a grinder or cut out the affected area and weld in a new panel. Always wear appropriate safety gear and follow proper welding procedures.
Underbody
The underbody is particularly susceptible to rust due to its constant exposure to moisture, salt, and road debris. Regularly inspect the underbody for rust and apply a rust inhibitor or undercoating to protect it. For existing rust, use a wire brush to remove loose particles and apply a rust converter or inhibitor. Consider having a professional rustproofing treatment applied for added protection.
Chrome Parts
Rust on chrome parts can be removed using specialized chrome cleaners or polishes. Apply the cleaner to a soft cloth and gently rub the affected area. Avoid using abrasive cleaners or scouring pads, as these can scratch the chrome finish.
Product Spotlight: 3M Rust Fighter-I
3M Rust Fighter-I is a popular and effective rust preventative coating designed to protect vehicle undercarriages, rocker panels, interior body panels, and other areas prone to corrosion. It’s an oil-based, self-healing coating that provides long-lasting protection against rust and corrosion. This product is widely used by automotive professionals and DIY enthusiasts alike.
Key Features of 3M Rust Fighter-I
- Self-Healing Formula: The coating is designed to flow and reseal minor scratches and abrasions, maintaining its protective barrier.
- Excellent Corrosion Protection: Provides superior protection against salt, moisture, and other corrosive elements.
- Easy Application: Can be applied with a spray gun or brush, making it suitable for various application methods.
- Long-Lasting Durability: Offers long-term protection, reducing the need for frequent reapplication.
- Versatile Application: Suitable for use on a wide range of surfaces, including metal, plastic, and rubber.
Benefits of Using 3M Rust Fighter-I
Using 3M Rust Fighter-I offers several significant benefits:
- Extended Vehicle Lifespan: By preventing rust and corrosion, it helps extend the lifespan of your vehicle.
- Improved Resale Value: A well-maintained, rust-free vehicle commands a higher resale value.
- Reduced Maintenance Costs: Prevents costly repairs associated with rust damage.
- Enhanced Safety: Protects critical structural components from corrosion, enhancing vehicle safety.
- Peace of Mind: Provides peace of mind knowing your vehicle is protected from the elements.
Comprehensive Review: 3M Rust Fighter-I
3M Rust Fighter-I is a highly regarded rust preventative coating that consistently receives positive reviews from users and experts alike. Its self-healing formula, excellent corrosion protection, and ease of application make it a popular choice for both automotive professionals and DIY enthusiasts.
User Experience and Usability
From our experience, 3M Rust Fighter-I is relatively easy to apply, whether using a spray gun or a brush. The coating flows smoothly and evenly, providing good coverage. The self-healing properties are a significant advantage, as they help maintain the protective barrier over time. The product has a strong odor, so proper ventilation is essential during application.
Performance and Effectiveness
3M Rust Fighter-I delivers on its promises of providing excellent corrosion protection. It effectively shields metal surfaces from salt, moisture, and other corrosive elements. Users consistently report that it helps prevent rust formation and extends the lifespan of their vehicles. It’s particularly effective in harsh environments, such as coastal areas and regions with snowy winters.
Pros
- Excellent Corrosion Protection: Provides superior protection against rust and corrosion.
- Self-Healing Formula: Reseals minor scratches and abrasions, maintaining the protective barrier.
- Easy Application: Can be applied with a spray gun or brush.
- Long-Lasting Durability: Offers long-term protection, reducing the need for frequent reapplication.
- Versatile Application: Suitable for use on a wide range of surfaces.
Cons/Limitations
- Strong Odor: Requires proper ventilation during application.
- Messy Application: Can be messy if not applied carefully.
- Requires Surface Preparation: Surface must be clean and dry before application.
- Oil-Based Formula: May attract dirt and dust over time.
Ideal User Profile
3M Rust Fighter-I is best suited for car owners who live in areas with harsh winters, coastal environments, or other conditions that promote rust formation. It’s also ideal for those who want to proactively protect their vehicles from corrosion and extend their lifespan. Both DIY enthusiasts and automotive professionals can benefit from using this product.
Key Alternatives
Some alternatives to 3M Rust Fighter-I include:
- Fluid Film: A lanolin-based rust preventative coating that’s known for its excellent penetration and corrosion protection.
- POR-15: A highly durable, moisture-cured coating that’s designed to stop rust and prevent it from spreading.
Expert Overall Verdict & Recommendation
3M Rust Fighter-I is a top-performing rust preventative coating that provides excellent corrosion protection and long-lasting durability. Its self-healing formula and ease of application make it a popular choice for both automotive professionals and DIY enthusiasts. We highly recommend 3M Rust Fighter-I for anyone looking to protect their vehicle from rust and extend its lifespan.
Q&A: Expert Insights on Rust Removal
-
Q: How can I identify the early signs of rust on my car?
A: Look for small, orange or brown spots on the paint surface, especially around edges, seams, and areas prone to scratches or chips. Bubbling or blistering paint can also indicate underlying rust. Regularly inspect the undercarriage for signs of corrosion.
-
Q: What’s the best way to prepare the surface before applying a rust converter?
A: Remove any loose rust particles with a wire brush or sandpaper. Clean the surface thoroughly with a wax and grease remover to remove any contaminants. Ensure the surface is dry before applying the rust converter.
-
Q: Can I use a pressure washer to remove rust?
A: While a pressure washer can remove loose rust particles, it’s not effective for removing embedded rust. It can also damage the paint and potentially spread rust to other areas. It’s best to use a wire brush or sandpaper for removing rust.
-
Q: How often should I apply rust preventative coatings to my car?
A: The frequency of application depends on the specific product and the environmental conditions. Generally, it’s recommended to reapply rust preventative coatings every one to two years, or more frequently in harsh environments.
-
Q: What are some common mistakes to avoid when removing rust from my car?
A: Avoid using abrasive cleaners or scouring pads, as these can scratch the paint. Don’t apply too much pressure when sanding, as this can damage the surrounding surface. Always follow the manufacturer’s instructions when using rust removal products or coatings.
-
Q: Is it possible to completely eliminate rust from a car?
A: While it’s difficult to completely eliminate rust, you can effectively remove it and prevent it from spreading. Regular maintenance and preventative measures are essential for keeping rust at bay.
-
Q: What’s the difference between rust converter and rust inhibitor?
A: Rust converters chemically convert rust into a stable compound, preventing further corrosion. Rust inhibitors create a protective barrier that prevents moisture and oxygen from reaching the metal surface.
-
Q: Can I use touch-up paint to cover up small rust spots?
A: Touch-up paint can be used to cover up small rust spots, but it’s important to remove the rust first and apply a primer to ensure proper adhesion. Otherwise, the rust will continue to spread underneath the touch-up paint.
-
Q: How can I protect my car’s undercarriage from rust?
A: Regularly inspect the undercarriage for rust and apply a rust inhibitor or undercoating to protect it. Consider having a professional rustproofing treatment applied for added protection. Avoid driving through deep puddles or flooded areas, as this can expose the undercarriage to moisture and contaminants.
-
Q: Are there any eco-friendly rust removal methods?
A: Vinegar and baking soda are relatively eco-friendly rust removal methods. Citric acid, found in lemons and limes, can also be used to dissolve rust. However, these methods may not be as effective as commercial rust removal products for severe rust.
Conclusion: Maintaining a Rust-Free Car
Mastering how to remove small rust spots from car is a critical skill for any car owner aiming to preserve their vehicle’s appearance and structural integrity. By understanding the science behind rust formation, utilizing the right tools and techniques, and implementing preventative measures, you can effectively combat rust and extend your car’s lifespan. Remember, early detection and prompt action are key to preventing minor rust spots from evolving into major corrosion problems. As leading experts in automotive care consistently emphasize, regular maintenance and proactive rust prevention are crucial for maintaining a rust-free car.
We hope this comprehensive guide has provided you with the knowledge and confidence to tackle rust spots effectively. Now, we encourage you to share your experiences with how to remove small rust spots from car in the comments below. Your insights and tips can help other car owners facing similar challenges. Consider exploring our advanced guide to automotive detailing for even more tips on maintaining your car’s appearance. Contact our experts for a consultation on how to remove small rust spots from car if you’re facing a particularly challenging situation.
