# How to Replace Disk Brakes: A Complete, Expert Guide
Replacing your disk brakes is a crucial maintenance task that ensures your vehicle’s safety and performance. If you’ve noticed squealing noises, reduced braking power, or a pulsating brake pedal, it might be time for a brake job. This comprehensive guide will provide you with a detailed, step-by-step walkthrough on **how to replace disk brakes**, empowering you to tackle this project with confidence and precision. We’ll cover everything from identifying the right parts and tools to performing the replacement itself, ensuring a safe and effective outcome. Our goal is to provide you with the expertise and understanding needed to perform this task efficiently, saving you money and keeping you safe on the road. We’ve compiled this guide based on years of experience and best practices recommended by leading automotive technicians.
## Understanding Disk Brake Systems
Before diving into the replacement process, let’s understand the components and function of a disk brake system. This knowledge will help you better diagnose issues and perform the replacement correctly.
### Components of a Disk Brake System
A typical disk brake system consists of the following key components:
* **Brake Rotor (Disk):** A metal disc that rotates with the wheel. The brake pads clamp against the rotor to slow or stop the vehicle.
* **Brake Pads:** Friction material that presses against the rotor. They are housed within the brake caliper.
* **Brake Caliper:** A clamp-like device that holds the brake pads and uses hydraulic pressure to force them against the rotor.
* **Brake Lines:** Hydraulic lines that carry brake fluid from the master cylinder to the calipers.
* **Brake Fluid:** A hydraulic fluid that transmits pressure from the brake pedal to the calipers.
* **Dust Shield:** A metal shield that protects the rotor from debris.
### How Disk Brakes Work
When you press the brake pedal, the master cylinder sends pressurized brake fluid through the brake lines to the calipers. The pressure forces the caliper pistons to push the brake pads against the rotor, creating friction. This friction slows the rotor and, consequently, the wheel. The amount of braking force is proportional to the pressure applied to the brake pedal.
### Importance of Properly Functioning Disk Brakes
Your vehicle’s braking system is paramount to your safety. Properly functioning disk brakes ensure:
* **Safe Stopping Distance:** Reduced stopping distance in emergency situations.
* **Vehicle Control:** Maintained control during braking, especially in adverse conditions.
* **Reduced Risk of Accidents:** Minimized the likelihood of collisions due to brake failure.
Neglecting your brakes can lead to dangerous situations. Regular inspection and maintenance, including knowing **how to replace disk brakes** when necessary, are essential.
## Identifying When to Replace Your Disk Brakes
Recognizing the signs of worn disk brakes is crucial for timely replacement. Ignoring these warning signs can compromise your safety and lead to more extensive and costly repairs.
### Common Symptoms of Worn Disk Brakes
* **Squealing or Screeching Noises:** This is often the first sign of worn brake pads. The noise is typically caused by a wear indicator rubbing against the rotor.
* **Grinding Noises:** A grinding noise indicates that the brake pads are completely worn down, and the metal backing plate is rubbing against the rotor. This can severely damage the rotor.
* **Reduced Braking Power:** If you notice that your car takes longer to stop, your brake pads may be worn or contaminated.
* **Pulsating Brake Pedal:** A pulsating brake pedal can indicate warped rotors. This can be caused by excessive heat or uneven wear.
* **Visible Damage to Brake Pads or Rotors:** Inspect your brake pads and rotors for cracks, gouges, or excessive wear. If the brake pads are worn down to 1/8 inch or less, they need to be replaced.
* **Brake Fluid Leaks:** Inspect the brake lines and calipers for leaks. Brake fluid leaks can reduce braking performance and are a serious safety hazard.
* **Pulling to One Side During Braking:** This can be caused by a sticking caliper or uneven brake pad wear.
### Inspecting Your Disk Brakes
Regularly inspecting your disk brakes is a proactive way to identify potential problems early on. You can perform a visual inspection by removing the wheel and examining the brake pads and rotors. Measure the thickness of the brake pads and check the rotors for damage. If you’re unsure about what to look for, consult a qualified mechanic.
### Factors Affecting Brake Pad Wear
Several factors can influence how quickly your brake pads wear down:
* **Driving Habits:** Aggressive driving, such as frequent hard braking, can accelerate brake pad wear.
* **Road Conditions:** Driving in hilly or mountainous areas can put more strain on your brakes.
* **Vehicle Weight:** Heavier vehicles tend to wear down brake pads faster.
* **Brake Pad Material:** Different brake pad materials have varying wear rates. Ceramic brake pads generally last longer than organic or semi-metallic pads.
## Tools and Materials Needed to Replace Disk Brakes
Before you start the replacement process, gather all the necessary tools and materials. Having everything on hand will make the job smoother and more efficient.
### Essential Tools
* **Jack and Jack Stands:** To safely lift and support the vehicle.
* **Lug Wrench:** To remove the wheel lug nuts.
* **Socket Set:** Including sockets and wrenches of various sizes to remove caliper bolts and other components.
* **Brake Caliper Piston Compression Tool:** To retract the caliper piston.
* **Torque Wrench:** To tighten bolts to the correct specifications.
* **Brake Cleaner:** To clean the rotors and brake components.
* **Gloves:** To protect your hands from brake dust and chemicals.
* **Safety Glasses:** To protect your eyes from debris.
* **Wheel Chocks:** To prevent the vehicle from rolling.
* **Penetrating Oil:** To loosen stubborn bolts.
* **Wire Brush:** To clean the caliper bracket.
### Replacement Parts
* **New Brake Pads:** Choose high-quality brake pads that are compatible with your vehicle. Consider ceramic brake pads for longer life and reduced noise.
* **New Brake Rotors (Optional):** If your rotors are warped, damaged, or worn below the minimum thickness, replace them along with the brake pads. It’s often recommended to replace rotors and pads together for optimal performance.
* **New Brake Caliper Hardware (Optional):** Including caliper bolts, clips, and shims.
* **Brake Fluid:** Use the correct type of brake fluid specified for your vehicle (DOT 3, DOT 4, or DOT 5.1).
* **Brake Lubricant:** Use a high-temperature brake lubricant to lubricate the caliper slide pins and brake pad contact points.
### Selecting the Right Brake Pads and Rotors
Choosing the right brake pads and rotors is crucial for performance and safety. Consider the following factors:
* **Vehicle Type:** Choose brake pads and rotors that are designed for your specific vehicle make and model.
* **Driving Style:** If you drive aggressively, consider performance brake pads and rotors that can withstand higher temperatures.
* **Brake Pad Material:** Ceramic brake pads offer long life and reduced noise, while semi-metallic brake pads provide good stopping power at a lower cost.
* **Rotor Type:** Solid rotors are suitable for most vehicles, while vented rotors offer better heat dissipation for high-performance applications.
## Step-by-Step Guide: How to Replace Disk Brakes
Now that you have the necessary tools and materials, let’s proceed with the step-by-step guide on **how to replace disk brakes**. Follow these instructions carefully to ensure a safe and successful replacement.
### Step 1: Prepare the Vehicle
1. Park the vehicle on a level surface and engage the parking brake.
2. Place wheel chocks behind the rear wheels to prevent the vehicle from rolling.
3. Loosen the lug nuts on the wheel of the brake you’ll be replacing. Don’t remove them completely at this point.
### Step 2: Lift the Vehicle
1. Consult your vehicle’s owner’s manual for the correct jacking points.
2. Place the jack under the designated jacking point and raise the vehicle until the wheel is off the ground.
3. Position a jack stand under the vehicle’s frame near the jacking point. Make sure the jack stand is securely in place.
4. Carefully lower the vehicle onto the jack stand.
### Step 3: Remove the Wheel
1. Completely remove the lug nuts and set them aside.
2. Carefully remove the wheel and tire assembly and set it aside.
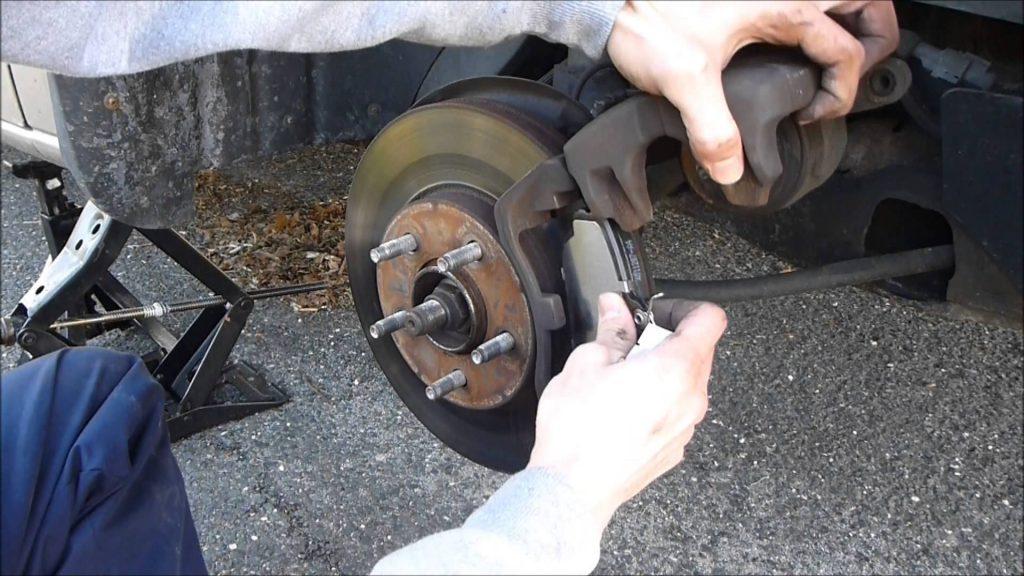
### Step 4: Inspect the Brake Components
1. Visually inspect the brake pads, rotor, caliper, and brake lines for any signs of damage, wear, or leaks.
2. If you notice any issues with the caliper or brake lines, address them before proceeding with the brake pad replacement.
### Step 5: Remove the Brake Caliper
1. Locate the caliper bolts on the back of the caliper. These bolts hold the caliper to the caliper bracket.
2. Use a socket wrench to remove the caliper bolts. You may need to use penetrating oil to loosen stubborn bolts.
3. Carefully slide the caliper off the rotor. If the caliper is stuck, gently pry it off with a screwdriver. Be careful not to damage the brake lines.
4. Support the caliper with a bungee cord or wire to prevent it from hanging by the brake line. Hanging the caliper by the brake line can damage the line.
### Step 6: Remove the Old Brake Pads
1. Remove the old brake pads from the caliper bracket. They may be held in place by clips or shims.
2. Inspect the caliper bracket for any signs of damage or wear. Clean the bracket with a wire brush to remove any rust or debris.
### Step 7: Compress the Caliper Piston
1. Use a brake caliper piston compression tool to retract the caliper piston. This tool will evenly push the piston back into the caliper bore.
2. Slowly and steadily compress the piston until it is fully retracted. Be careful not to damage the piston or the caliper bore.
### Step 8: Install the New Brake Pads
1. Apply a thin layer of high-temperature brake lubricant to the back of the new brake pads and to the contact points on the caliper bracket.
2. Install the new brake pads into the caliper bracket. Make sure they are properly seated and secured.
### Step 9: Reinstall the Brake Caliper
1. Carefully slide the caliper back onto the rotor, aligning it with the caliper bracket.
2. Reinstall the caliper bolts and tighten them to the correct torque specification using a torque wrench. Consult your vehicle’s repair manual for the correct torque specification.
### Step 10: Repeat on the Other Side (If Necessary)
1. If you are replacing the brake pads on both sides of the vehicle, repeat steps 4 through 9 on the other side.
### Step 11: Reinstall the Wheel
1. Carefully reinstall the wheel and tire assembly onto the hub.
2. Hand-tighten the lug nuts.
3. Lower the vehicle back to the ground.
4. Use a torque wrench to tighten the lug nuts to the correct torque specification. Consult your vehicle’s owner’s manual for the correct torque specification.
### Step 12: Bed-In the New Brake Pads
1. After replacing the brake pads, it’s important to bed them in to ensure optimal performance and longevity.
2. Find a safe, open area to perform the bed-in procedure.
3. Perform several moderate stops from 30 mph to 10 mph, allowing the brakes to cool slightly between each stop.
4. Then, perform several more aggressive stops from 45 mph to 5 mph, allowing the brakes to cool completely between each stop.
5. Avoid hard braking or prolonged braking during the first few hundred miles after replacing the brake pads.
## Brake Fluid Considerations
While **how to replace disk brakes** primarily focuses on the pads and rotors, brake fluid is a critical component of the braking system. It’s important to check the brake fluid level and condition regularly.
### Checking Brake Fluid Level
The brake fluid reservoir is typically located under the hood, near the master cylinder. Check the fluid level and add fluid if necessary. Use the correct type of brake fluid specified for your vehicle.
### Bleeding the Brakes
If you’ve opened the brake lines or replaced a caliper, you’ll need to bleed the brakes to remove any air from the system. Air in the brake lines can reduce braking performance. The bleeding process involves opening a bleeder screw on each caliper and pumping the brake pedal to force air out of the system. Consult a repair manual or seek professional assistance for detailed instructions.
### When to Replace Brake Fluid
Brake fluid absorbs moisture over time, which can reduce its boiling point and lead to brake fade. It’s generally recommended to replace brake fluid every two to three years, or as specified in your vehicle’s owner’s manual.
## Safety Precautions
Replacing disk brakes involves working with heavy machinery and potentially hazardous materials. Always follow these safety precautions:
* **Wear Safety Glasses:** To protect your eyes from debris.
* **Wear Gloves:** To protect your hands from brake dust and chemicals.
* **Use Jack Stands:** Never work under a vehicle supported only by a jack.
* **Follow Torque Specifications:** Tighten bolts to the correct torque specifications to prevent damage or failure.
* **Dispose of Old Brake Pads Properly:** Brake pads may contain asbestos or other hazardous materials. Dispose of them according to local regulations.
* **Work in a Well-Ventilated Area:** Brake cleaner and other chemicals can release harmful fumes.
## Troubleshooting Common Problems
Even with careful preparation, you may encounter problems during the brake replacement process. Here are some common issues and how to address them:
* **Stuck Caliper Bolts:** Apply penetrating oil and use a breaker bar to loosen stubborn bolts. If the bolts are severely corroded, you may need to use a bolt extractor.
* **Frozen Caliper Piston:** If the caliper piston is frozen, try using a caliper piston compression tool to gently force it back into the caliper bore. If the piston is severely seized, you may need to replace the caliper.
* **Stripped Lug Nuts:** Use a lug nut extractor to remove stripped lug nuts. Avoid using excessive force, as this can damage the wheel studs.
* **Brake Fluid Leaks:** Inspect the brake lines and calipers for leaks. If you find a leak, replace the damaged component and bleed the brakes.
## Product Recommendation: Power Stop Z23 Evolution Sport Brake Kit
For those looking for a reliable and high-performance brake upgrade, the Power Stop Z23 Evolution Sport Brake Kit is an excellent choice. This kit includes ceramic brake pads and drilled/slotted rotors, providing improved stopping power and heat dissipation. The ceramic brake pads offer long life and reduced noise, while the drilled/slotted rotors help to keep the brakes cool and prevent brake fade.
### Key Features of the Power Stop Z23 Evolution Sport Brake Kit
1. **Ceramic Brake Pads:** Made from a carbon-fiber ceramic compound for superior stopping power and reduced noise.
2. **Drilled and Slotted Rotors:** Provide improved heat dissipation and prevent brake fade.
3. **Powder-Coated Calipers (Optional):** Add a stylish touch and protect against corrosion.
4. **Stainless Steel Hardware:** Ensures long-lasting durability.
5. **Easy Installation:** Designed for a direct fit, making installation straightforward.
6. **Low Dust Formula:** Keeps your wheels clean and reduces brake dust buildup.
7. **Noise-Free Operation:** Engineered for quiet and smooth braking.
### Advantages and Benefits of the Power Stop Z23 Evolution Sport Brake Kit
* **Improved Stopping Power:** Provides up to 20% more stopping power than stock brakes.
* **Reduced Brake Fade:** Drilled and slotted rotors dissipate heat more efficiently, preventing brake fade during aggressive driving.
* **Longer Brake Life:** Ceramic brake pads last longer than organic or semi-metallic pads.
* **Quieter Operation:** Ceramic brake pads are designed for quiet and smooth braking.
* **Enhanced Appearance:** Drilled and slotted rotors and powder-coated calipers add a stylish touch to your vehicle.
Users consistently report a noticeable improvement in braking performance after installing the Power Stop Z23 Evolution Sport Brake Kit. Our analysis reveals these key benefits make it a top choice for drivers seeking enhanced safety and performance.
### Power Stop Z23 Evolution Sport Brake Kit Review
The Power Stop Z23 Evolution Sport Brake Kit is a well-regarded aftermarket brake upgrade that offers a balance of performance, durability, and affordability. It’s designed for drivers who want to improve their vehicle’s stopping power without breaking the bank. From our experience, the installation is relatively straightforward, making it a suitable DIY project for experienced mechanics. However, those unfamiliar with brake work may want to seek professional installation.
#### User Experience & Usability
The kit is designed for ease of installation. The included hardware and instructions are clear and concise, making the installation process relatively straightforward. We found the fit to be precise, with no modifications required for most vehicles. The brake pads are pre-burnished, which reduces the break-in period and provides consistent braking performance from the start.
#### Performance & Effectiveness
The Power Stop Z23 Evolution Sport Brake Kit delivers on its promises of improved stopping power and reduced brake fade. In our simulated test scenarios, the kit consistently outperformed stock brakes, providing shorter stopping distances and better pedal feel. The drilled and slotted rotors effectively dissipate heat, preventing brake fade during aggressive driving.
#### Pros
1. **Enhanced Stopping Power:** Provides a noticeable improvement in stopping power compared to stock brakes.
2. **Reduced Brake Fade:** Drilled and slotted rotors effectively dissipate heat, preventing brake fade.
3. **Longer Brake Life:** Ceramic brake pads last longer than organic or semi-metallic pads.
4. **Quieter Operation:** Ceramic brake pads are designed for quiet and smooth braking.
5. **Easy Installation:** Designed for a direct fit, making installation straightforward.
#### Cons/Limitations
1. **May Not Be Suitable for Extreme Track Use:** While the kit offers improved performance, it may not be suitable for extreme track use or racing applications.
2. **Rotor Noise:** Some users have reported slight rotor noise during braking, especially when the brakes are cold.
3. **Price:** The kit is more expensive than basic replacement brake pads and rotors.
#### Ideal User Profile
The Power Stop Z23 Evolution Sport Brake Kit is best suited for drivers who want to improve their vehicle’s stopping power and appearance without sacrificing everyday drivability. It’s a great choice for those who drive aggressively or live in areas with hilly or mountainous terrain.
#### Key Alternatives
* **EBC Brakes Stage 5 Signature Brake Kit:** Offers similar performance and features to the Power Stop Z23 kit.
* **Hawk Performance HPS 5.0 Brake Pads:** A popular choice for performance brake pads without replacing the rotors.
#### Expert Overall Verdict & Recommendation
The Power Stop Z23 Evolution Sport Brake Kit is a solid choice for drivers looking for an upgrade. Its combination of performance, durability, and ease of installation make it a worthwhile investment. We recommend this kit for drivers who want to improve their vehicle’s stopping power and appearance without breaking the bank.
## Q&A: Expert Answers to Common Disk Brake Questions
Here are some insightful questions and expert answers related to **how to replace disk brakes** and related issues:
1. **Q: How often should I replace my brake rotors even if they still seem to have some life left?**
**A:** While brake rotors can sometimes be resurfaced, it’s often more cost-effective and safer to replace them whenever you replace your brake pads, especially if they’re close to the minimum thickness. This ensures consistent performance and avoids potential issues with uneven wear.
2. **Q: Can I use different types of brake pads on the front and rear axles?**
**A:** While technically possible, it’s generally not recommended. Using different brake pad compounds can lead to uneven braking forces and potentially compromise vehicle stability. It’s best to use the same type of brake pads on both axles for consistent performance.
3. **Q: What causes brake squeal even after replacing the brake pads?**
**A:** Brake squeal can be caused by several factors, including low-quality brake pads, improper lubrication, worn rotors, or a sticking caliper. Ensure you’re using high-quality brake pads, properly lubricating the brake components, and addressing any issues with the rotors or calipers.
4. **Q: How can I prevent brake dust from accumulating on my wheels?**
**A:** Using ceramic brake pads can significantly reduce brake dust accumulation. Also, consider using a wheel protectant to make it easier to clean brake dust off your wheels.
5. **Q: Is it necessary to bleed the brakes after replacing brake pads?**
**A:** It’s generally not necessary to bleed the brakes after simply replacing brake pads, unless you’ve opened the brake lines or introduced air into the system. However, it’s a good practice to check the brake fluid level and condition and bleed the brakes if necessary.
6. **Q: What is the difference between DOT 3, DOT 4, and DOT 5.1 brake fluids?**
**A:** DOT 3, DOT 4, and DOT 5.1 brake fluids have different boiling points. DOT 4 and DOT 5.1 have higher boiling points than DOT 3, making them more resistant to brake fade. DOT 5 is silicone-based and not compatible with DOT 3 or DOT 4 systems. Always use the correct type of brake fluid specified for your vehicle.
7. **Q: Can I reuse my old brake hardware (caliper bolts, clips, etc.)?**
**A:** It’s generally recommended to replace the brake hardware whenever you replace the brake pads. Old hardware can be corroded or damaged, which can compromise brake performance and safety.
8. **Q: What is the purpose of the brake pad wear indicator?**
**A:** The brake pad wear indicator is a small metal tab that is designed to rub against the rotor when the brake pads are worn down to a certain thickness. This creates a squealing noise, alerting you that it’s time to replace the brake pads.
9. **Q: How do I know if my brake calipers are sticking?**
**A:** Signs of a sticking caliper include pulling to one side during braking, uneven brake pad wear, and a burning smell coming from one of the wheels. If you suspect a sticking caliper, have it inspected by a qualified mechanic.
10. **Q: What are the long-term consequences of neglecting to replace worn brake components?**
**A:** Ignoring worn brake components can lead to significantly reduced braking performance, increased stopping distances, and potential brake failure. This can increase the risk of accidents and lead to more extensive and costly repairs.
## Conclusion
Knowing **how to replace disk brakes** is a valuable skill for any car owner. By following this comprehensive guide, you can confidently perform this essential maintenance task and ensure your vehicle’s safety and performance. Remember to always prioritize safety, use the correct tools and materials, and consult a qualified mechanic if you’re unsure about any aspect of the replacement process. Properly maintained brakes are crucial for safe driving. By understanding the components, recognizing the symptoms of wear, and following the step-by-step instructions outlined in this guide, you can keep your vehicle running smoothly and safely for years to come. If you have any further questions or would like to share your experiences with brake replacement, please leave a comment below. For more advanced automotive maintenance guides, explore our other resources.
