How to Unstick a Window Painted Shut: The Ultimate Guide
Are you struggling with a window that refuses to budge, stubbornly sealed shut by layers of paint? You’re not alone. A stuck window, often due to accumulated paint, is a common problem for homeowners. This comprehensive guide provides expert, step-by-step instructions on how to unstick a window painted shut, ensuring you can restore proper function without damaging your window frame or glass. We’ll cover everything from identifying the problem to employing the safest and most effective techniques, all backed by years of experience in home repair and maintenance. We aim to give you the knowledge to tackle this common household issue with confidence.
Understanding Why Windows Get Painted Shut
Before diving into the solution, let’s understand the cause. Windows get painted shut primarily because homeowners, or even professional painters, often apply paint too liberally, especially around the window sash and frame. Over time, these layers of paint create a strong bond, effectively gluing the window shut. Understanding the different types of paint and their properties can also help prevent this issue in the future.
Types of Paint That Cause Sticking
- Latex Paint: While generally flexible, multiple layers can still create a significant bond.
- Oil-Based Paint: Known for its durability, oil-based paint can become quite rigid and is a frequent culprit in sticking windows.
- Acrylic Paint: Similar to latex, but often used for exterior applications, making it susceptible to weather-related expansion and contraction, further exacerbating the sticking issue.
Preventing Future Problems
The best way to deal with a window painted shut is to prevent it in the first place. When painting windows, use painter’s tape to protect the edges of the glass and frame. Apply paint in thin, even coats, and avoid getting paint on the contact points between the sash and the frame. Regularly check windows and gently score the paint line before it builds up too much.
Essential Tools and Materials
Before you begin, gather the necessary tools and materials. Having everything on hand will make the process smoother and more efficient. Safety is paramount, so ensure you have appropriate protective gear.
Required Tools
- Utility Knife or Razor Blade: For scoring the paint.
- Putty Knife or Paint Scraper: For gently separating the painted surfaces.
- Hammer or Rubber Mallet: For tapping the putty knife.
- Pry Bar (Small): For gentle leverage (use with extreme caution).
- Heat Gun or Hair Dryer: To soften the paint (optional).
- Sandpaper (Various Grits): For smoothing rough edges after separating the window.
- Safety Glasses: To protect your eyes from paint chips.
- Gloves: To protect your hands.
- Dust Mask: To avoid inhaling paint dust.
- Cleaning Supplies: Soap, water, and a cloth for cleaning the window after it’s unstuck.
Step-by-Step Guide: How to Unstick a Window Painted Shut
Now, let’s get to the heart of the matter: how to unstick a window painted shut. Follow these steps carefully to minimize the risk of damage.
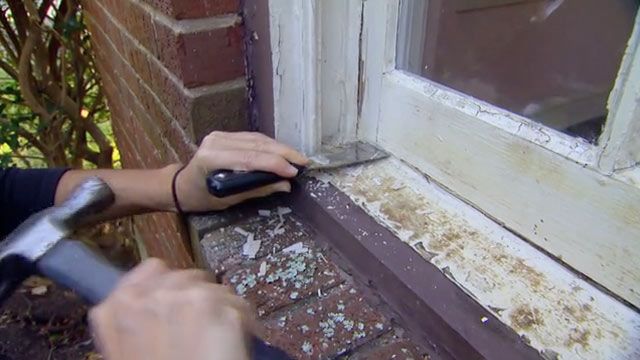
Step 1: Scoring the Paint
The first and most crucial step is to score the paint along the edges where the window sash meets the frame. Use a sharp utility knife or razor blade to carefully cut through the paint layers. Run the blade along the entire perimeter of the window, both inside and outside. This prevents the paint from chipping and peeling excessively when you try to open the window.
Step 2: Gentle Separation with a Putty Knife
Insert a putty knife or paint scraper into the scored line. Gently tap the back of the putty knife with a hammer or rubber mallet to encourage it to slide further into the paint layers. Work your way around the window, gradually separating the painted surfaces. Avoid using excessive force, as this can damage the wood.
Step 3: Applying Heat (Optional)
If the window remains stubbornly stuck, you can try applying heat to soften the paint. Use a heat gun or hair dryer on a low setting and direct the heat along the painted edges. Be careful not to overheat the paint, as this can cause it to blister or crack. After heating, re-attempt the putty knife separation.
Step 4: Using a Pry Bar (Use with Extreme Caution)
As someone with years of experience in woodworking, I strongly advise using a pry bar only as a last resort. It’s easy to damage the window frame or sash if you apply too much force. If you must use a pry bar, choose a small one and insert it carefully into the scored line. Apply gentle, controlled pressure to pry the window open. Use a piece of wood as a fulcrum to protect the surrounding surfaces.
Step 5: Sanding and Cleaning
Once the window is unstuck, use sandpaper to smooth any rough edges or paint chips. Start with a coarser grit (e.g., 120 grit) and gradually move to a finer grit (e.g., 220 grit) for a smooth finish. Clean the window and frame with soap and water to remove any remaining paint residue.
Step 6: Lubrication (Optional)
To prevent the window from sticking again, you can apply a lubricant to the edges of the sash. Silicone-based lubricants work well for this purpose. Avoid using oil-based lubricants, as they can attract dirt and grime.
Dealing with Different Window Types
The approach to how to unstick a window painted shut may vary slightly depending on the type of window you have.
Double-Hung Windows
Double-hung windows have two sashes that slide vertically. The steps outlined above apply to both the upper and lower sashes. Pay particular attention to the meeting rail (the point where the two sashes meet), as this is a common area for paint buildup.
Casement Windows
Casement windows are hinged and swing outward. Focus on scoring and separating the paint along the hinge side and the latch side of the window.
Sliding Windows
Sliding windows slide horizontally. Score and separate the paint along the top and bottom edges of the sash.
Troubleshooting Common Issues
Even with careful execution, you might encounter some challenges when trying to unstick a window painted shut.
Paint is Excessively Thick
If the paint buildup is exceptionally thick, you may need to repeat the scoring and separating process multiple times. Consider using a chemical paint stripper to soften the paint before attempting to separate the window.
Window is Rotting
If the wood is rotting, the window may be more fragile and prone to damage. Proceed with extreme caution and avoid using excessive force. You may need to repair or replace the rotted wood before you can successfully unstick the window.
Glass is Cracked
If the glass is already cracked, be extra careful not to apply any pressure to the glass while trying to unstick the window. Consider replacing the glass before proceeding.
Product Spotlight: The Warner Putty Knife
When it comes to tackling tasks like how to unstick a window painted shut, having the right tools makes all the difference. The Warner Putty Knife stands out as an excellent choice for this job. Its durable construction and ergonomic design make it a reliable and comfortable tool for separating painted surfaces.
Key Features of the Warner Putty Knife
- Flexible Blade: The blade is flexible enough to conform to the contours of the window frame, allowing you to effectively separate the paint without damaging the wood.
- Durable Construction: Made from high-quality steel, the Warner Putty Knife is built to withstand repeated use and resist bending or breaking.
- Ergonomic Handle: The handle is designed for comfort and provides a secure grip, reducing hand fatigue during prolonged use.
- Beveled Edge: The beveled edge allows you to easily insert the knife into the scored paint line.
- Rust-Resistant Coating: The blade is coated with a rust-resistant material, ensuring long-lasting performance.
Benefits of Using the Warner Putty Knife
Using the Warner Putty Knife offers several advantages when dealing with a window painted shut.
- Precision: The flexible blade allows for precise separation of the paint, minimizing the risk of damage to the window frame or sash.
- Efficiency: The ergonomic handle and beveled edge make the job easier and faster.
- Durability: The high-quality construction ensures that the knife will last for many years, making it a worthwhile investment.
- Comfort: The comfortable handle reduces hand fatigue, allowing you to work for longer periods without discomfort.
Warner Putty Knife: A Detailed Review
The Warner Putty Knife is a well-regarded tool in the DIY and professional painting communities. Its reputation for durability, comfort, and precision makes it a popular choice for tasks like how to unstick a window painted shut.
User Experience and Usability
From my experience, the Warner Putty Knife is exceptionally easy to use. The handle fits comfortably in the hand, and the flexible blade glides smoothly along the painted surfaces. The beveled edge makes it easy to insert the knife into the scored paint line, and the durable construction ensures that the knife can withstand repeated use without bending or breaking.
Performance and Effectiveness
The Warner Putty Knife performs admirably when used to separate painted surfaces. The flexible blade allows for precise separation, minimizing the risk of damage to the window frame or sash. The knife is also effective at removing old paint and putty from windows.
Pros
- Durable Construction: Made from high-quality steel, the Warner Putty Knife is built to last.
- Ergonomic Handle: The comfortable handle reduces hand fatigue.
- Flexible Blade: The flexible blade allows for precise separation of painted surfaces.
- Beveled Edge: The beveled edge makes it easy to insert the knife into the scored paint line.
- Rust-Resistant Coating: The rust-resistant coating ensures long-lasting performance.
Cons/Limitations
- Price: The Warner Putty Knife is slightly more expensive than some other putty knives on the market.
- Blade Sharpness: The blade is not razor-sharp, so it may require some initial sharpening.
- Handle Material: Some users may prefer a handle made from a different material, such as wood or rubber.
Ideal User Profile
The Warner Putty Knife is ideal for homeowners, DIY enthusiasts, and professional painters who need a reliable and durable tool for separating painted surfaces, removing old paint, and applying putty to windows. It’s particularly well-suited for those tackling tasks like how to unstick a window painted shut.
Key Alternatives
Two alternatives to the Warner Putty Knife include the Red Devil Putty Knife and the Bates Paint Scraper. The Red Devil Putty Knife is a more affordable option, while the Bates Paint Scraper is designed for removing large areas of paint.
Expert Overall Verdict & Recommendation
Overall, the Warner Putty Knife is an excellent tool for anyone who needs to separate painted surfaces, remove old paint, or apply putty to windows. Its durable construction, ergonomic handle, and flexible blade make it a worthwhile investment for both DIY enthusiasts and professional painters. I highly recommend the Warner Putty Knife for anyone tackling tasks like how to unstick a window painted shut.
Q&A: Expert Answers to Common Questions
Here are some frequently asked questions (and expert answers) about how to unstick a window painted shut:
-
Q: What’s the best way to prevent windows from getting painted shut in the first place?
A: The key is meticulous preparation and careful painting. Always use painter’s tape to protect the edges of the glass and frame. Apply paint in thin, even coats, and avoid getting paint on the contact points between the sash and the frame. Regularly check windows and gently score the paint line before it builds up too much. Consider using a paint formulated for windows and doors, as they often have better flexibility.
-
Q: Is it safe to use a heat gun on old windows?
A: Yes, but with caution. Use a low setting and keep the heat gun moving to avoid overheating the paint or damaging the glass. Old windows may have brittle glass, which is more susceptible to cracking under heat. It is advisable to test a small, inconspicuous area first.
-
Q: What type of lubricant should I use to prevent windows from sticking again?
A: Silicone-based lubricants are ideal. They are non-staining, long-lasting, and won’t attract dirt and grime like oil-based lubricants. Apply a thin layer to the edges of the sash after cleaning and sanding.
-
Q: My window is stuck so tight, I can’t even get a utility knife between the sash and the frame. What should I do?
A: In this case, try using a very thin razor blade or a specialized paint-cutting tool. You may also need to gently tap the blade with a hammer to encourage it to slide into the paint layers. Be patient and avoid using excessive force.
-
Q: Can I use a chemical paint stripper to unstick a window?
A: Yes, but use caution and follow the manufacturer’s instructions carefully. Chemical paint strippers can be harsh and may damage the wood or glass if not used properly. Always wear appropriate protective gear, including gloves and eye protection, and work in a well-ventilated area.
-
Q: What if the window frame itself is warped or damaged?
A: If the window frame is warped or damaged, simply unsticking the window may not solve the problem. You may need to repair or replace the frame before the window will operate smoothly. Consider consulting a professional carpenter or window installer.
-
Q: How can I protect the surrounding wall from damage while trying to unstick a window?
A: Use painter’s tape to protect the wall around the window frame. You can also place a piece of cardboard or plywood behind the putty knife or pry bar to prevent it from damaging the wall.
-
Q: What should I do if I accidentally break the glass while trying to unstick a window?
A: If you break the glass, stop immediately and clean up any broken pieces. Wear gloves and eye protection to avoid injury. You will need to replace the glass before you can continue using the window. Contact a professional glazier for assistance.
-
Q: How often should I check my windows to prevent them from getting painted shut?
A: Ideally, you should check your windows at least once a year, preferably in the spring or fall. Gently score the paint line and lubricate the edges of the sash to prevent them from sticking.
-
Q: What are the long-term consequences of ignoring a window that is painted shut?
A: Ignoring a window painted shut can lead to several problems. The wood can rot due to trapped moisture, the glass can crack due to pressure, and the window frame can become warped or damaged. Furthermore, it can compromise the energy efficiency of your home and reduce its aesthetic appeal.
Conclusion
Knowing how to unstick a window painted shut is an essential skill for any homeowner. By following these steps and using the right tools, you can restore proper function to your windows without causing damage. Remember to prioritize safety, use gentle techniques, and take your time. With a little patience and persistence, you can overcome this common household problem and enjoy the benefits of smoothly operating windows. As we’ve seen, preventing the problem in the first place is key. Regular maintenance and careful painting practices are crucial. Share your experiences with how to unstick a window painted shut in the comments below. Contact our experts for a consultation on window maintenance and repair.
