How to Replace Rubber Gasket on Infinity Car Door: A Comprehensive Guide
Replacing the rubber gasket on your Infinity car door might seem daunting, but with the right tools and guidance, it’s a manageable DIY project. This comprehensive guide provides a step-by-step approach, ensuring a weather-tight seal and preventing leaks, wind noise, and potential damage to your vehicle. We’ll cover everything from identifying the correct replacement gasket to the final steps of installation, drawing on expert techniques and practical advice to help you achieve professional-quality results. This article is designed to provide unparalleled depth and clarity, giving you the confidence to tackle this task yourself and save money on costly repairs. We aim to be the definitive resource on how to replace rubber gasket on infinity car door.
Understanding Car Door Gaskets and Their Importance
Car door gaskets, also known as weatherstripping or door seals, are crucial components that form a barrier between the car’s interior and the external environment. They’re typically made of durable rubber or synthetic materials designed to withstand temperature fluctuations, UV exposure, and physical wear. Over time, these gaskets can become cracked, brittle, or detached, leading to various problems.
* **Preventing Water Leaks:** Damaged gaskets can allow rainwater to seep into the car, potentially causing rust, mold growth, and electrical damage.
* **Reducing Wind Noise:** Worn gaskets can create gaps that allow wind to whistle through, making your driving experience less enjoyable.
* **Maintaining Cabin Temperature:** Properly sealed doors help to insulate the car, keeping it warm in the winter and cool in the summer, improving fuel efficiency and comfort.
* **Protecting Against Dust and Debris:** Gaskets prevent dust, dirt, and other debris from entering the cabin, keeping it clean and improving air quality.
The importance of maintaining these seals cannot be overstated. Regular inspection and timely replacement are vital for preserving your Infinity’s value, comfort, and overall condition.
Identifying the Correct Replacement Gasket for Your Infinity
Before you begin the replacement process, it’s essential to identify the correct gasket for your specific Infinity model and year. Using the wrong gasket can result in a poor fit, ineffective seal, and potential damage to the door frame.
* **Consult Your Owner’s Manual:** Your owner’s manual may contain information about the gasket type and part number.
* **Check Online Parts Catalogs:** Reputable online auto parts retailers offer detailed catalogs that allow you to search for gaskets based on your car’s make, model, and year. Inputting your VIN (Vehicle Identification Number) is often the most accurate way to find the correct part.
* **Contact Your Local Infinity Dealership:** The parts department at your local Infinity dealership can provide you with the correct gasket and answer any questions you may have. While potentially more expensive, you can guarantee the correct fit.
* **Compare with the Original Gasket:** Carefully examine your existing gasket and compare it to the images and descriptions of potential replacements. Pay attention to the shape, size, and mounting style.
It’s crucial to ensure that the replacement gasket is specifically designed for your Infinity model. Universal gaskets may not provide a proper seal and can lead to further problems. Always prioritize a precise fit for optimal performance.
Tools and Materials Needed for Gasket Replacement
Gathering the necessary tools and materials before you start will streamline the replacement process and ensure a smooth, efficient experience.
* **New Rubber Gasket:** The correct replacement gasket for your Infinity model.
* **Flathead Screwdriver or Trim Removal Tool:** For gently prying off the old gasket without damaging the door frame.
* **Clean Rags or Microfiber Cloths:** For cleaning the door frame and new gasket.
* **Rubbing Alcohol or Automotive Cleaner:** For removing dirt, grease, and adhesive residue.
* **Adhesive Primer (Optional):** For improving adhesion of the new gasket in some cases.
* **Weatherstrip Adhesive:** A high-quality adhesive designed specifically for rubber gaskets (3M Weatherstrip Adhesive is a popular choice).
* **Scissors or Utility Knife:** For trimming the gasket if necessary.
* **Gloves:** To protect your hands from dirt and adhesive.
* **Masking Tape:** To hold the gasket in place while the adhesive dries.
* **Heat Gun or Hair Dryer (Optional):** To soften the old adhesive and make removal easier.
Having all these items readily available will make the job significantly easier and prevent unnecessary delays.
Step-by-Step Guide: How to Replace Rubber Gasket on Infinity Car Door
This section provides a detailed, step-by-step guide on how to replace the rubber gasket on your Infinity car door. Follow these instructions carefully to ensure a successful installation.
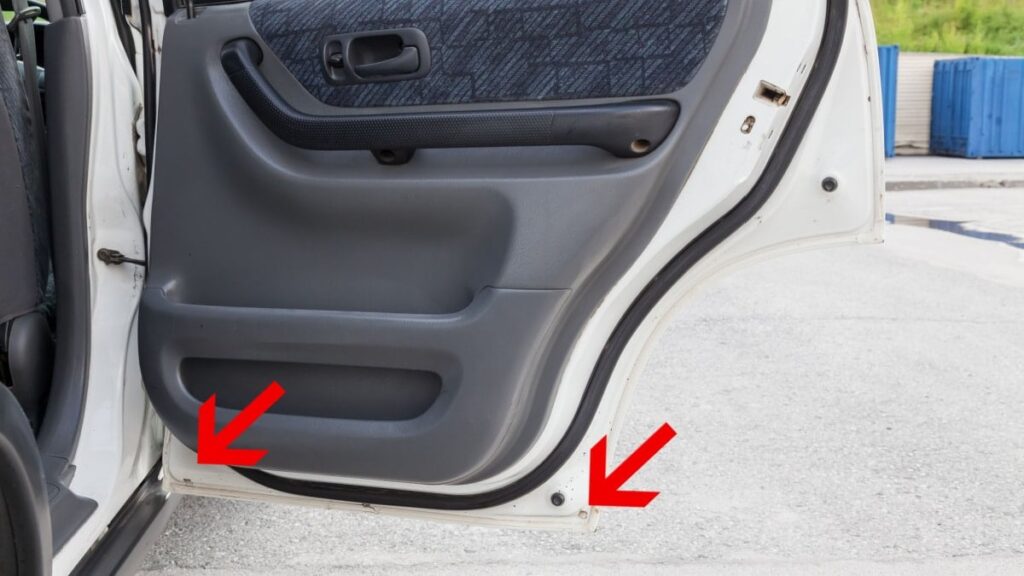
Step 1: Removing the Old Gasket
* **Prepare the Area:** Park your Infinity in a well-lit area and open the door you’ll be working on. Clean the door frame and surrounding area with a clean rag to remove any dirt or debris.
* **Loosen the Gasket:** Use a flathead screwdriver or trim removal tool to gently pry up one end of the old gasket. Be careful not to scratch or damage the paint.
* **Remove the Gasket:** Slowly peel the gasket away from the door frame, working your way around the entire perimeter. If the adhesive is stubborn, use a heat gun or hair dryer to soften it. Apply heat sparingly and avoid overheating the paint.
* **Clean the Surface:** Once the gasket is removed, use rubbing alcohol or automotive cleaner to remove any remaining adhesive residue. A plastic scraper can be helpful for stubborn spots. Ensure the surface is clean and dry before proceeding.
Step 2: Preparing the New Gasket
* **Test Fit the Gasket:** Hold the new gasket against the door frame to ensure it fits properly. If necessary, trim the gasket to the correct length using scissors or a utility knife. It’s better to err on the side of caution and trim a little at a time.
* **Apply Adhesive Primer (Optional):** If the gasket or door frame manufacturer recommends using an adhesive primer, apply it to the surfaces where the gasket will be attached. Allow the primer to dry completely before proceeding.
Step 3: Applying the Adhesive
* **Apply Adhesive to the Gasket:** Apply a thin, even bead of weatherstrip adhesive to the back of the new gasket, following the manufacturer’s instructions. Be careful not to apply too much adhesive, as it can squeeze out and create a mess. A small brush can help spread the adhesive evenly.
* **Apply Adhesive to the Door Frame (Optional):** Some installers prefer to apply a thin layer of adhesive to the door frame as well. This can improve adhesion and create a stronger bond. If you choose to do this, allow the adhesive to become slightly tacky before attaching the gasket.
Step 4: Installing the New Gasket
* **Attach the Gasket:** Carefully align the new gasket with the door frame and press it firmly into place. Start at one end and work your way around the entire perimeter, ensuring that the gasket is properly seated.
* **Secure the Gasket:** Use masking tape to hold the gasket in place while the adhesive dries. Apply tape every few inches to ensure a secure bond. Pay particular attention to corners and areas where the gasket may be prone to lifting.
* **Allow the Adhesive to Dry:** Allow the adhesive to dry completely according to the manufacturer’s instructions. This typically takes several hours, or even overnight. Avoid opening or closing the door during this time.
Step 5: Final Touches
* **Remove the Masking Tape:** Once the adhesive is fully dry, carefully remove the masking tape.
* **Inspect the Seal:** Inspect the gasket to ensure that it is properly sealed against the door frame. Look for any gaps or areas where the gasket may be loose. Gently press down on any loose areas to improve adhesion.
* **Test the Door:** Close the door and check for any wind noise or water leaks. If you notice any problems, re-inspect the gasket and make any necessary adjustments.
By following these steps carefully, you can successfully replace the rubber gasket on your Infinity car door and restore its weather-tight seal.
Common Mistakes to Avoid When Replacing Car Door Gaskets
While replacing a car door gasket is a relatively straightforward process, there are several common mistakes that can lead to problems. Avoiding these pitfalls will ensure a successful and long-lasting repair.
* **Using the Wrong Gasket:** As mentioned earlier, using the wrong gasket can result in a poor fit and ineffective seal. Always verify that the gasket is specifically designed for your Infinity model.
* **Not Cleaning the Surface Properly:** Failing to remove old adhesive residue and dirt can prevent the new gasket from adhering properly. Thoroughly clean the door frame before applying the new gasket.
* **Applying Too Much Adhesive:** Applying too much adhesive can create a mess and prevent the gasket from seating properly. Use a thin, even bead of adhesive and avoid squeezing it out.
* **Not Securing the Gasket During Drying:** Failing to secure the gasket with masking tape can allow it to shift or lift during the drying process. Use plenty of tape to hold the gasket firmly in place.
* **Opening the Door Too Soon:** Opening the door before the adhesive is fully dry can disrupt the bond and lead to leaks. Allow the adhesive to dry completely according to the manufacturer’s instructions.
By avoiding these common mistakes, you can ensure a successful and long-lasting gasket replacement.
Maintaining Your New Car Door Gasket for Longevity
Once you’ve replaced your car door gasket, proper maintenance is essential for prolonging its lifespan and ensuring continued performance. Here are some tips for maintaining your new gasket:
* **Regular Cleaning:** Clean your gaskets regularly with a mild soap and water solution to remove dirt, dust, and debris. Avoid using harsh chemicals or abrasive cleaners, as they can damage the rubber.
* **Lubrication:** Apply a silicone-based lubricant to your gaskets every few months to keep them pliable and prevent them from drying out and cracking. Silicone spray is a good option.
* **UV Protection:** Park your car in a shaded area or use a car cover to protect your gaskets from UV exposure, which can cause them to deteriorate over time.
* **Regular Inspection:** Inspect your gaskets regularly for signs of wear, such as cracks, tears, or detachment. Address any issues promptly to prevent further damage.
By following these maintenance tips, you can extend the life of your new car door gasket and ensure a weather-tight seal for years to come.
Troubleshooting Common Issues After Gasket Replacement
Even with careful installation, you may encounter some issues after replacing your car door gasket. Here are some common problems and their solutions:
* **Wind Noise:** If you hear wind noise after replacing the gasket, it may indicate that the seal is not tight enough. Re-inspect the gasket and make sure it is properly seated. You may need to apply additional adhesive or adjust the door latch.
* **Water Leaks:** If you notice water leaks after replacing the gasket, it may indicate that there are gaps in the seal. Re-inspect the gasket and make sure it is properly seated. You may need to apply additional adhesive or replace the gasket with a new one.
* **Door Closing Difficulty:** If you have difficulty closing the door after replacing the gasket, it may indicate that the gasket is too thick. Try adjusting the door latch or using a thinner gasket.
* **Gasket Detachment:** If the gasket starts to detach from the door frame, it may indicate that the adhesive is not strong enough. Re-apply adhesive to the detached area and secure the gasket with masking tape until the adhesive dries.
By troubleshooting these common issues, you can ensure that your new car door gasket provides a reliable and long-lasting seal.
Expert Insights and Advanced Techniques
For those seeking to elevate their gasket replacement skills, here are some expert insights and advanced techniques:
* **Using a Heat Gun for Precise Molding:** A heat gun can be used to gently mold the gasket to the contours of the door frame, ensuring a perfect fit.
* **Applying Seam Sealer for Extra Protection:** Seam sealer can be applied to the joints in the gasket to provide an extra layer of protection against water leaks.
* **Consulting a Professional:** If you’re unsure about any aspect of the gasket replacement process, don’t hesitate to consult a professional auto mechanic. They can provide expert advice and assistance.
Q&A: Addressing Your Top Concerns About Car Door Gasket Replacement
Here are some frequently asked questions about car door gasket replacement:
1. **How often should I replace my car door gaskets?**
The lifespan of a car door gasket depends on various factors, such as climate, usage, and material quality. However, as a general rule, it’s recommended to inspect your gaskets annually and replace them every 5-7 years, or sooner if you notice any signs of damage or wear.
2. **Can I use a universal gasket instead of a model-specific one?**
While universal gaskets may seem like a convenient and cost-effective option, they are generally not recommended. Model-specific gaskets are designed to fit the exact contours of your car door frame, ensuring a proper seal. Universal gaskets may not provide the same level of protection and can lead to leaks and wind noise.
3. **What type of adhesive should I use for car door gasket replacement?**
It’s crucial to use a high-quality weatherstrip adhesive specifically designed for rubber gaskets. 3M Weatherstrip Adhesive is a popular and reliable choice. Avoid using general-purpose adhesives, as they may not provide a strong enough bond or withstand the elements.
4. **How can I prevent my new car door gasket from drying out and cracking?**
Regular lubrication with a silicone-based lubricant can help prevent your new car door gasket from drying out and cracking. Apply the lubricant every few months to keep the rubber pliable and protect it from UV damage.
5. **Is it necessary to use an adhesive primer before installing the new gasket?**
Whether or not you need to use an adhesive primer depends on the specific gasket and door frame materials. Some manufacturers recommend using a primer to improve adhesion, while others do not. Consult the gasket manufacturer’s instructions for guidance.
6. **Can I replace the car door gasket myself, or should I hire a professional?**
Replacing a car door gasket is a manageable DIY project for most car owners, provided you have the right tools and follow the instructions carefully. However, if you’re unsure about any aspect of the process or lack the necessary tools, it’s always best to hire a professional auto mechanic.
7. **What are the signs that my car door gasket needs to be replaced?**
Common signs that your car door gasket needs to be replaced include visible cracks, tears, or detachment, as well as wind noise, water leaks, and difficulty closing the door.
8. **Will replacing my car door gasket improve my car’s fuel efficiency?**
Yes, replacing a worn or damaged car door gasket can improve your car’s fuel efficiency by reducing air leaks and helping to maintain a consistent cabin temperature. This can reduce the strain on your car’s heating and cooling systems, resulting in better fuel economy.
9. **How do I clean my car door gaskets without damaging them?**
To clean your car door gaskets without damaging them, use a mild soap and water solution and a soft cloth or sponge. Avoid using harsh chemicals or abrasive cleaners, as they can degrade the rubber.
10. **What should I do if I accidentally get adhesive on my car’s paint?**
If you accidentally get adhesive on your car’s paint, try to remove it as soon as possible using a clean cloth and a solvent specifically designed for removing adhesive residue. Test the solvent in an inconspicuous area first to ensure it doesn’t damage the paint.
The Future of Car Door Gasket Technology
While the fundamental purpose of car door gaskets remains the same, advancements in materials and design continue to improve their performance and durability. Future gaskets may incorporate self-healing polymers, advanced noise-dampening materials, and integrated sensors to detect leaks and provide real-time feedback. These innovations will further enhance the comfort, safety, and efficiency of modern vehicles.
Conclusion: Sealing the Deal on a Quieter, More Comfortable Ride
Replacing the rubber gasket on your Infinity car door is an investment in your vehicle’s long-term health and your own driving comfort. By following the steps outlined in this comprehensive guide, you can restore a weather-tight seal, reduce wind noise, and prevent costly water damage. Remember to choose the correct replacement gasket, use high-quality adhesive, and maintain your new gasket properly to ensure years of reliable performance. We’ve shared our expertise on how to replace rubber gasket on infinity car door, and hope you found it valuable. Now it’s your turn. Share your experiences with car door gasket replacement in the comments below and let’s continue the conversation!
