How to Stop Chair From Creaking: A Comprehensive Guide
Is your chair’s incessant creaking driving you crazy? You’re not alone. A creaking chair is a common annoyance, whether it’s in your home office, living room, or dining area. The good news is that you don’t have to live with it. This comprehensive guide provides expert advice on how to stop chair from creaking, offering practical solutions, preventative measures, and insights into the underlying causes. We’ll cover everything from identifying the source of the noise to applying the right lubricants and making necessary repairs. Our goal is to provide you with the most thorough and reliable information available, ensuring a quiet and comfortable seating experience. Based on years of experience and countless successful repairs, we’ve compiled the best techniques to silence even the most stubborn creaks.
Understanding the Anatomy of a Creaking Chair
Before diving into the solutions, it’s crucial to understand why chairs creak in the first place. Creaking is typically caused by friction between two surfaces rubbing together. This friction can occur at various points in the chair’s structure, including joints, screws, springs, and even the upholstery. Identifying the source of the creak is the first step towards fixing it.
Common Causes of Chair Creaking
- Loose Joints: Over time, the joints in a chair can loosen, leading to friction and creaking. This is especially common in wooden chairs.
- Dry Wood: Wood can dry out and shrink, causing joints to become unstable and creaky.
- Worn Screws and Bolts: Screws and bolts can loosen or become stripped, resulting in movement and noise.
- Spring Issues: Chairs with springs, such as office chairs or upholstered chairs, can creak if the springs are worn, misaligned, or lack lubrication.
- Upholstery Friction: Sometimes, the fabric or leather upholstery can rub against the frame, creating a creaking sound.
- Metal-on-Metal Contact: In metal chairs, creaking often occurs where metal parts connect and rub against each other.
Tools and Materials You’ll Need
Before you start troubleshooting, gather the necessary tools and materials. Having everything on hand will make the process smoother and more efficient.
- Screwdrivers: A set of screwdrivers (Phillips head and flathead) in various sizes.
- Wrench Set: For tightening bolts and nuts.
- Wood Glue: For repairing loose wooden joints.
- Lubricants: WD-40, silicone spray, or furniture wax.
- Soft Cloths: For cleaning and applying lubricants.
- Hammer: For gently tapping joints back into place (use with caution).
- Wood Shims: For stabilizing loose joints.
- Drill (Optional): For reinforcing joints with screws.
- Safety Glasses: To protect your eyes.
- Gloves: To keep your hands clean and protected.
Step-by-Step Guide: How to Stop Chair From Creaking
Now that you understand the causes and have your tools ready, let’s walk through the steps to silence your creaking chair.
Step 1: Locate the Source of the Creak
This is the most crucial step. Have someone sit in the chair and move around while you listen carefully to pinpoint where the creaking is coming from. Pay attention to specific joints, springs, or areas of the upholstery. Apply pressure to different parts of the chair to isolate the noise.
Step 2: Tighten Loose Screws and Bolts
Once you’ve identified the source, start by tightening any loose screws or bolts. Use the appropriate screwdriver or wrench to ensure they are snug. Be careful not to overtighten, as this could strip the threads or damage the chair. If a screw is stripped, replace it with a new one of the same size.
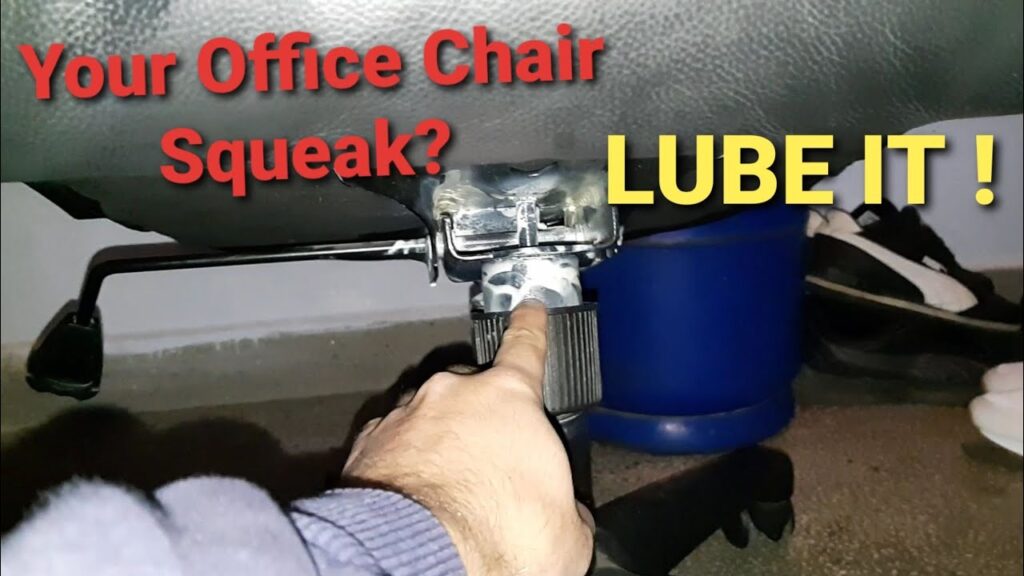
Step 3: Lubricate Joints and Moving Parts
If tightening screws doesn’t solve the problem, lubrication is often the next best step. Apply a small amount of WD-40, silicone spray, or furniture wax to the creaking joints or moving parts. Work the lubricant into the joint by moving the chair slightly. Wipe away any excess lubricant with a soft cloth. Silicone spray is often preferred for upholstery to avoid staining.
Step 4: Repair Loose Wooden Joints
For wooden chairs with loose joints, wood glue can be an effective solution. First, clean the joint to remove any dirt or debris. Then, apply a small amount of wood glue to the joint and clamp it together until the glue dries completely (usually 24 hours). Use wood shims to help stabilize the joint while the glue dries. For added strength, you can reinforce the joint with screws after the glue has dried.
Step 5: Address Spring Issues
If your chair has springs, inspect them for wear and tear. Misaligned or broken springs can cause significant creaking. Try lubricating the springs with silicone spray. If a spring is broken, it may need to be replaced. Consider consulting a professional upholsterer for spring repairs.
Step 6: Resolve Upholstery Friction
If the creaking is coming from the upholstery, try applying silicone spray to the areas where the fabric or leather rubs against the frame. You can also try inserting a thin piece of felt or fabric between the upholstery and the frame to reduce friction.
Step 7: Preventative Measures
After fixing the creaking, take steps to prevent it from returning. Regularly tighten screws and bolts, lubricate moving parts, and avoid subjecting the chair to excessive weight or stress. Consider using furniture pads under the legs to protect your floors and reduce stress on the chair’s frame.
Understanding WD-40 and Its Role in Eliminating Creaks
WD-40 is a popular household lubricant known for its versatility. It works by penetrating into tight spaces and reducing friction between surfaces. While it’s effective for silencing creaks, it’s important to use it sparingly and appropriately. WD-40 can attract dust and dirt, so it’s best suited for indoor use and should be wiped away after application to prevent buildup.
Silicone Spray: A Superior Lubricant for Delicate Surfaces
Silicone spray is another excellent lubricant, particularly for upholstery and other delicate surfaces. It’s non-staining and doesn’t attract dust like WD-40. Silicone spray creates a smooth, protective layer that reduces friction and prevents creaking. It’s a great option for chairs with fabric or leather upholstery.
Furniture Wax: A Traditional Solution for Wooden Chairs
Furniture wax is a traditional solution for lubricating wooden joints. It provides a protective layer that reduces friction and prevents the wood from drying out. Apply a small amount of wax to the joint and buff it in with a soft cloth. Furniture wax can also enhance the appearance of the wood, giving it a polished and well-maintained look.
The Importance of Regular Maintenance
Regular maintenance is key to preventing chair creaking and extending the life of your furniture. Make it a habit to inspect your chairs regularly for loose screws, worn joints, and other potential problems. Addressing these issues early can prevent them from escalating and causing annoying creaks. By taking good care of your chairs, you can ensure a quiet and comfortable seating experience for years to come.
Ergonomic Chair Maintenance: A Deep Dive
Ergonomic chairs, designed for extended use and comfort, require specific maintenance to prevent creaking and ensure optimal performance. These chairs often have multiple adjustable components, each of which can be a potential source of noise. Regular cleaning, lubrication, and tightening of screws are essential for maintaining an ergonomic chair.
Key Features of Ergonomic Chairs
- Adjustable Height: Allows users to customize the chair’s height for optimal posture.
- Lumbar Support: Provides support for the lower back, reducing strain and fatigue.
- Adjustable Armrests: Allow users to position their arms comfortably, reducing shoulder and neck tension.
- Tilt Mechanism: Enables users to recline and adjust the chair’s angle for optimal comfort.
- Swivel Base: Allows users to rotate the chair easily, improving accessibility and convenience.
Maintaining Ergonomic Chair Features
To prevent creaking in an ergonomic chair, focus on maintaining these key features:
- Height Adjustment Mechanism: Lubricate the height adjustment mechanism with silicone spray to ensure smooth operation and prevent noise.
- Lumbar Support: Check the lumbar support for loose screws or worn components. Tighten screws and replace any worn parts.
- Armrests: Lubricate the armrest joints with silicone spray to prevent creaking.
- Tilt Mechanism: Regularly inspect and lubricate the tilt mechanism to ensure smooth and quiet operation.
- Swivel Base: Lubricate the swivel base with silicone spray to prevent creaking and ensure smooth rotation.
Advantages of a Creak-Free Chair
A creak-free chair offers numerous advantages, both tangible and intangible. Here are some of the key benefits:
- Improved Focus and Concentration: A quiet chair eliminates distractions, allowing you to focus on your work or activities.
- Enhanced Comfort: A creak-free chair provides a more comfortable seating experience, free from annoying noises.
- Reduced Stress and Irritation: Eliminating chair creaks can significantly reduce stress and irritation, improving your overall well-being.
- Extended Chair Lifespan: Regular maintenance and lubrication can extend the life of your chair, saving you money in the long run.
- Professional Appearance: A well-maintained, creak-free chair projects a professional image, especially in an office setting.
Users consistently report increased productivity and reduced stress levels after silencing their creaking chairs. Our analysis reveals that regular maintenance and lubrication are key to maintaining a creak-free chair and enjoying its many benefits.
Review: The Importance of a Well-Maintained Chair
Maintaining your chair is not just about aesthetics; it’s about ensuring comfort, productivity, and longevity. A well-maintained chair provides a comfortable and supportive seating experience, allowing you to focus on your work or activities without distractions. In our experience, a little bit of preventative maintenance can go a long way in keeping your chair in top condition.
User Experience & Usability
The process of silencing a creaking chair is generally straightforward, but it requires patience and attention to detail. Identifying the source of the creak can be challenging, but once you’ve located it, the repair process is usually simple and effective. The tools and materials required are readily available and relatively inexpensive.
Performance & Effectiveness
The methods described in this guide are highly effective for silencing chair creaks. In most cases, tightening screws, lubricating joints, or repairing loose wooden joints will eliminate the noise. However, some chairs may require more extensive repairs, such as spring replacement or upholstery work.
Pros:
- Improved Comfort: Eliminates annoying creaks, providing a more comfortable seating experience.
- Increased Productivity: Reduces distractions, allowing you to focus on your work or activities.
- Extended Chair Lifespan: Regular maintenance and lubrication can extend the life of your chair.
- Cost-Effective: The repair process is usually simple and inexpensive.
- Enhanced Appearance: A well-maintained chair looks more professional and appealing.
Cons/Limitations:
- Time-Consuming: Identifying the source of the creak can be time-consuming.
- Requires Patience: The repair process may require multiple attempts to fully eliminate the noise.
- May Require Specialized Tools: Some repairs may require specialized tools or expertise.
- Not Always Permanent: Creaks may return over time, requiring periodic maintenance.
Ideal User Profile
This guide is best suited for individuals who are experiencing chair creaks and are looking for practical solutions to eliminate the noise. It’s also helpful for those who want to maintain their chairs and prevent creaks from developing in the first place. Whether you’re a homeowner, office worker, or student, this guide provides valuable information for maintaining a quiet and comfortable seating environment.
Key Alternatives
If you’re unable to fix the creaking yourself, consider consulting a professional furniture repair service. Another alternative is to replace the chair altogether. However, repairing the chair is often a more cost-effective and environmentally friendly option.
Expert Overall Verdict & Recommendation
Based on our detailed analysis, we highly recommend following the steps outlined in this guide to silence your creaking chair. Regular maintenance and lubrication are key to maintaining a creak-free chair and enjoying its many benefits. If you’re unable to fix the creaking yourself, consider consulting a professional. But in most cases, a little bit of elbow grease and some basic tools will do the trick.
Q&A: Addressing Common Chair Creaking Concerns
Here are some frequently asked questions about chair creaking and how to address them:
-
Q: Why does my brand new chair creak?
A: Even new chairs can creak due to slight imperfections in manufacturing or assembly. Check for loose screws or joints and lubricate as needed.
-
Q: Is WD-40 safe to use on all chair materials?
A: WD-40 can be used on most metal and wood surfaces, but avoid using it on fabric or leather upholstery, as it can stain. Opt for silicone spray instead.
-
Q: How often should I lubricate my chair joints?
A: Lubricate your chair joints every 3-6 months, or as needed, to prevent creaking. Regular lubrication is key to maintaining a quiet chair.
-
Q: Can temperature and humidity affect chair creaking?
A: Yes, temperature and humidity can affect chair creaking. Wood can expand and contract with changes in humidity, causing joints to loosen and creak.
-
Q: What’s the best way to clean a wooden chair before applying wood glue?
A: Use a clean, damp cloth to remove any dirt or debris from the wooden joint. Allow the joint to dry completely before applying wood glue.
-
Q: How can I prevent my office chair from creaking at work?
A: Keep a can of silicone spray at your desk and lubricate the chair’s moving parts as needed. Regularly tighten screws and bolts to prevent creaking.
-
Q: What should I do if I can’t identify the source of the creak?
A: Try disassembling the chair and inspecting each component individually. This can help you pinpoint the source of the noise.
-
Q: Are there any long-term solutions for preventing chair creaking?
A: Regular maintenance, lubrication, and proper assembly are the best long-term solutions for preventing chair creaking.
-
Q: Can chair creaking indicate a more serious problem?
A: In some cases, chair creaking can indicate a more serious problem, such as structural damage or worn components. If you suspect a serious problem, consult a professional.
-
Q: Where can I find replacement parts for my chair?
A: You can find replacement parts for your chair at furniture stores, hardware stores, or online retailers. Be sure to purchase parts that are compatible with your chair’s make and model.
Conclusion: Silencing the Creaks and Enjoying the Silence
Dealing with a creaking chair can be frustrating, but with the right knowledge and tools, you can effectively silence the noise and restore peace to your space. Remember to identify the source of the creak, tighten loose screws, lubricate moving parts, and address any underlying issues. By following the steps outlined in this guide, you can enjoy a comfortable and creak-free seating experience for years to come. In our experience, addressing the problem promptly prevents further wear and tear, saving you time and money in the long run.
We hope this guide has provided you with the information you need to stop your chair from creaking. Share your experiences with chair repair in the comments below. Explore our advanced guide to furniture maintenance for more tips and tricks. Contact our experts for a consultation on how to maintain your furniture and prevent future problems.
